Tuesday, November 20, 2012

etcetera ...

Admiring someone else's plate


A Taste of Auckland

I took the resident hobby photographer along to the Taste of Auckland culinary festival last Thursday (for his photography prowess, not his conversation skills L). Fortunately, those exhibiting had conversation in abundance for me so I didn’t feel lonely. The threatened rain stayed away until we were heading home and little plops began to fall.  Good timing.  

Euro's lamb dish

I’d done some research beforehand to save time dithering on what I was going to sample, so off we headed to Euro for my “main course” of lamb, while Bill chose and slurped his way through their wickedly good sauce of jalapeno crème fraiche, dotted with a small helping of crab and prawns.  He won on that round. My roasted lamb rump was fine but I thought it would be great.  The mint and pea panna cotta accompanying it was the real standout both for taste and attractiveness.

My wine pick from the Vilagrad Winery stand was a 3 Brothers Wairarapa Pinot Noir and strangely enough for me, this was the only glass or taste I had all evening.

Make mine a Prawn Cocktail please

Reversing my own meal order and returning to starters, I visited Mexico for the tall cocktail of Prawns in Chipotle Mayo with baby cos lettuce, green gazpacho and candied lime.  The latter stole the show for me, with its sweet twist giving a fresh touch to the dish.  Bill had the beef skirt tacos with green tomatillo, candied pepitas and nasturtium leaves, which he found just “okay”.  Top marks though for Mexico’s colourful stand design.

And so to my favourite part of any meal, anytime, anywhere  (I scour the dessert menu before anything else – don’t tell me you’re not the same?).  There was no way I was savouring any dessert other than that from Kermadec chef, Juan Balsani.  After his demo at the NZ Food Bloggers’ Conference at the Chocolate Festival in Wellington, I have been waiting for this. 

The chocolate I've been waiting for...

If there was any reason I wish I had not taken Bill along, it was precisely at that moment when, chatting with chef Juan, he (jokingly, okay?) told him that I had his photo on our walls at home.  I wished I’d worn sharp stilettos with which to force a long hole for me to drop into with my scarlet face (and given Bill a quick, sharp kick on my way down!)  I recovered enough to immerse myself in the delicious experience of breaking open that chocolate globe to spoon up the glorious silky chocolate inside, combining it with the taste texture sensation of cocoa powder and green pepper tuiles, balsamic poached strawberries and polenta crumbs.  Maravilloso!

For the record, Bill did another round of mains and dessert at Depot with a BBQ pulled pork slider with apple slaw and pickled jalapenos and, to finish, his favourite sweet – lemon meringue pie with cream – which looked so appealing with its perfect peaks.  He was more than happy with his choices.

We headed home out of the city and over the hills after a thoroughly pleasant evening meandering around food tents, listening to cool music from the Nairobi Trio or Peter Urlich and tasting whatever took our fancy from places we'd really like to visit.  That’s what Taste of Auckland is all about.


Tuesday, November 13, 2012

Poached Pears with Clotted Cream


Say July to me and I’ll tell you it’s summer.  Even after twenty years of being in the southern hemisphere I still can’t get my seasons right.  I’m eating and cooking with pears and my mind’s tuning in to autumn, hence the pears. Here. Now. When it’s not autumn.  But somewhere in the world it is autumn (or fall), so this is for you, my friend.

The starting point was clotted cream.  If you are familiar with clotted cream in England you may be disappointed to find “Devonshire teas” in New Zealand are not served with traditional clotted cream but with ordinary whipped cream.  I was, but then I got over it.

Some time ago, a work colleague, who hails from Devon, gave me a slow cooker recipe for clotted cream.  She was excited as she’d sent it in to NZ chef Peter Gordon in response to his request in his newspaper column for clotted cream suppliers and her reply was published.  It is so very easy you must try it.

Instead of marrying it up with scones, I matched it with some poached pears for a simple pudding (I love the word “pudding”).  The inspiration came from some poached pears I’d eaten at Dida’s Food Store in Auckland during a dinner and talk with Dianne Jacob (more on that in my next Etcetera post).

Traditionally clotted cream uses unpasteurized milk but, hey ho, even though I live in the country the only milk making it to my house is the supermarket standard (full cream) milk.  (Visions of me on a milking stool milking a cow? Not likely!)


This pudding is my entry for Sweet New Zealand, hosted for November by pet lover, Lucy at The Kitchen Maid.

Tips for clotted cream

Start the recipe two days before required as it has to cook for 10 hours, cool and then chill  for 10 hours.

Follow the instructions for the use of your own slow cooker.

Try and match the dish you use for the cream and milk to the shape of your slow cooker for maximum area coverage.  The more surface area you have the more cream you will get as the cream forms on the surface of the dish.  So if you have an oval shaped slow cooker, use an oval shaped dish.  I used a Pyrex glass dish (without the lid) inside the slow cooker.  

After skimming off the top, cover the leftover milk with the lid and store in the fridge.  Use it to make scones or a rice pudding. 

Store the cream in the fridge but leave at room temperature prior to serving to soften.

The cream is best eaten on the day or next day. 


Clotted Cream

Makes a small bowlful (see photo above) - approximately ¾ cup.  
Double the recipe if required and if you have the room in your slow cooker.

500mls (1 pint) full cream milk
250mls (1/2 pint) single cream


Turn the slow cooker on to “low” setting.

Invert a saucer on the bottom of the slow cooker.  Place a Pyrex dish, or similar, on top of the saucer to fit your slow cooker. 

Mix the milk and cream in a large jug and pour gently into the bowl in the slow cooker.

Carefully pour water into the slow cooker so that it comes up to approximately 4cms from the top of the container holding the milk and cream.   Replace lid on slow cooker (not container) and leave for approximately 10 hours or overnight.  A lovely golden crust should have formed.

Leave to cool, then place in fridge for approx 10 hours. Take crust and cream off the top (it pretty much comes off in one piece) and there you have it, yummy clotted cream.  Stir gently and serve.

Save the leftover milk in the fridge for another recipe.

Poached Pears

4 firm eating pears, firm and slightly under-ripe
600ml (1 pint) good red wine
65g (2½ oz) sugar

Peel the pears, leaving the stalk on and keeping the pears whole.  Place in a heavy saucepan, add the wine and sugar, stir and bring to the boil.  Reduce heat and simmer for about 1 hour, or until the pears are tender (test them with a skewer trying not to mark them too much). 

When the pears are ready remove with a slotted spoon and keep warm.

Reduce the liquid over a high heat until it has the consistency of syrup. 

Place the pears on the plates and spoon over the syrup.


Monday, October 22, 2012

Millionaires’ Shortbread


Millionaires’ shortbread.  Those two words have been repeating and repeating in my mind over the last few days.  I blame these two here and here for doubly tempting me with chocolate treats that looked irresistible, if only I had them in front of me.  Try as I might (and I did try), I could not stop thinking of them.  The mantra would not leave me and so I indulged my hankering for things chocolate and made some of my own.  I feel good.

You may know these as chocolate caramel slices or something like that.  I’ve always known them in Scotland as Millionaires’ Shortbread and surely that perfectly describes shortbread, dressed up with layers of caramel and chocolate riches?

I make no excuses for my less than perfect serves.  I fail regularly on the "precision cutting, no smudges, marks or blemishes" type of perfection.  It is home baking after all.


Millionaires’ Shortbread
makes about 24 squares

Shortbread
175g butter, softened
75g caster sugar
250g plain flour
a pinch of salt

Caramel layer
100g butter
100g soft brown sugar (or muscovado sugar)
2 tablespoons golden syrup
2 x 375g cans sweetened condensed milk

Chocolate layer
200g good dark chocolate (over 70% cocoa) (or use milk chocolate if you prefer)


Method
Preheat the oven to 180°C/350°F.

Lightly grease and line the bottom of a Swiss roll tin approximately 33x23cm (13x9 inches).

Shortbread layer
Cream the butter and sugar together until pale and fluffy (scraping down the mixture two or three times during the mixing).

Sift the flour and salt into the mixture and bring together until a dough is formed.  Press the dough into the tin until evenly spread.  Prick the dough lightly with a fork.

Bake for 15-20 minutes or until the shortbread is firm to the touch and lightly browned (as you can see from the photo some of mine were more lightly browned than others!).

Leave to cool in the tin.

Caramel layer
Put the butter, sugar, golden syrup and condensed milk into a saucepan and heat gently until the sugar has dissolved.  Increase the heat and bring to the boil, stirring all the time.  When it reaches boiling, reduce heat and simmer gently, still stirring continuously, for about 5 minutes or until the mixture has thickened slightly.  Pour over the cooled shortbread layer and leave to set.

Note: It is important to stir continuously and not let the caramel “catch” or burn in the saucepan.  If lumps appear, remove pan from heat for a few seconds then return to simmer gently.  Remove any lumps by pouring the caramel onto the shortbread layer through a sieve.  As long as the caramel does not taste burnt (let it cool slightly before you try it!), it will be fine.

Chocolate topping
Break the chocolate into squares or pieces.  Melt the chocolate in a bowl placed over a saucepan of simmering water (don’t let the water touch the bowl) until it is smooth and there are no lumps.

Pour the melted chocolate over the cold caramel layer and leave to set.

When the chocolate is just set, cut into squares or bars.

Note:  If you like thicker layers, just add more caramel and/or chocolate the next time.  

Tuesday, October 16, 2012

Cranberry, vanilla and yogurt loaf


I was having a sloth-like morning.  Everything I touched turned to “no”.  Didn’t feel like going out, didn’t feel like baking.  Three times I started gathering ingredients for recipes and three times I put them away.  Most unproductive.  I loathe using the phrase “I can’t be bothered”, but that’s how I felt.

Later in the afternoon the apathy lifted and a sudden burst of energy resulted in this lovely loaf which wasn’t even in the running earlier.  It does have the air of a “cheer me now” cake so perhaps it was just what I needed.  Each slice has little bursts of cranberries and a taste and texture reminiscent of a madeira cake.  The icing could be optional but I urge you to spread it on.  It adds a crunch, a tang, a touch of sweetness and just makes it look way more special than an ordinary fruit loaf. 

This little happy cake is my entry to Sweet New Zealand hosted this month by the delightful Sue at Couscous & Consciousness.  


Cranberry, vanilla and yogurt loaf

100g butter
100g caster sugar
300g Greek-style (or natural) yogurt
2 teaspoons vanilla essence
250g standard flour
2 tsp bicarbonate of soda
150g dried cranberries

for the icing
100g icing sugar, sifted
1-2 tbsp fresh orange juice, sieved
pink food colouring


Preheat oven to 160°C (180°F)

Grease and line a 1kg (2lb) loaf tin. 

Cream the butter and sugar in a cake mixer until soft and fluffy (you will need to scrape down the sides of the bowl a couple of times in the process). 

Add the yogurt and vanilla and mix on lowest speed until just combined.

Sift the flour and bicarbonate of soda together and fold gently into the mix in two batches.  Add the cranberries and fold in gently (check the cranberries do not stick together in bunches).  Do not overmix.

Spoon the mix into the loaf tin.  Level the top with a palette knife dipped in a little hot water. 

Bake in the oven for approximately 50 minutes or until the loaf is golden brown and a skewer inserted in the middle comes out clean.

Leave the cake in the tin to cool completely, then ice.


For the icing

Sift the icing sugar into a bowl and add enough orange juice to make a smooth consistency, not too runny or too thick.  (Add more icing sugar if too runny or more orange juice if too thick).  Add a drop of food colouring.  I use a skewer for this and dip it into the colouring, adding enough to reach the desired colour.  Mix thoroughly until smooth and colouring incorporated.  Spread or drizzle over the cake and leave to set.

Adapted from a recipe for sour cherry yogurt cake from Gorgeous Cakes by Annie Bell.


Monday, October 8, 2012

best ever cheese scones


So here goes, you taste scones at Le Cordon Bleu cooking school (see here) and they're the best cheese scones you have ever tasted.  Everyone around you agrees so you really have to try these at home, don’t you?  Problem was I had no recipe, only a few hints and clues hastily scribbled on my iPhone. (Can you scribble on an iPhone? Yes, I think you can ‘cos it has a font that looks like handwriting.)

In my first attempt, finding the right mix was like playing Cluedo.  Was it the plain flour with the cheese in the kitchen?  No?  Perhaps the self-raising flour with the salt in the parlour?  Good job I like Cluedo.  I may not have got all three answers in the bag but I was pretty pleased with the result. I have to admit it took me five scones to figure that out.  In my defence, they were small ones.


For the second trial, I used guinea pigs in the form of two strapping lads who came inside for a coffee break after digging up the garden beds (with my permission, I might add).  This time I’d tweaked the recipe by changing the plain flour to self-raising and adding more cheese.

I have good news and bad news.  The good news is that I only ate three scones this time.  The bad news is that they were bigger scones.  I know, it’s only bad news for me.  

The even better news is that they worked.  The boys were happy, I was happy and maybe you could be happy too if you just try them, who knows?  They may not be 100% as gorgeous and perfect looking as Le Cordon Bleu’s but I think they’re still a winner. 

The secret, I think, is to:
  •  use lots of cheese (I used Vintage* cheddar)
  •  have a wet dough
  •  handle the dough as little as possible
If you make them slightly smaller, like the first batch, you don’t even need butter.  They are simply yummy! 


Best ever cheese scones

2 cups self-raising flour
¼ teaspoon salt
50g cold butter
2/3 cup cheddar cheese (I used Mainland Vintage*)
1 cup milk
extra cheese to top the scones

Heat the oven to 230°C (450°F).

Sift the flour and salt into a mixing bowl.  Either grate the chilled butter into the mix or cut it into small dices.  With your fingertips, rub the flour and butter together until it resembles breadcrumbs.  Stir in the cheese.

Mix the cup of milk in lightly and quickly using a knife or palette knife until it just forms a dough. Do not overmix.  The dough will be quite wet at this stage.

On a lightly floured board and with floured hands, gently roll the dough into a long cylindrical shape and shape into an even thickness.  If the dough feels too sticky, put a little more flour on the board and your hands – just enough to continue. Cut into rounds, big or small, and place them on a greased oven tray or a tray lined with greaseproof paper. 

Grate some extra cheese over the tops of the scones – I like to use a reasonable amount.

Place the tray near the top of the oven.  Bake for 10-15 minutes until the scones are golden brown.  Remove to a cake rack and cover with a dry tea towel to keep warm.  Serve as is, or with butter.

Best eaten warm on the day – believe me they don’t last long.

* Mainland Vintage is an aged cheddar with a crumbly texture and real bite.

For a sweet alternative, click here for cranberry & custard scones


Saturday, September 29, 2012

Very Berry Belgian Biscuits


I may have said this before but I have had less success with biscuits than any other form of baking.  Since I started this blog though I’ve been feeling happier with my biscuit baking results, particularly the Passionfruit and Monte Carlo cream biscuits from earlier posts.  Time then for another biscuit recipe.

I often see Belgian biscuits in cafes, but I suspect the uniformity in their shape, size and colour indicates they are bought in from a supplier. They always look so attractive though and I wanted to make them at home.

I like the spiciness of these biscuits and (I almost feel ashamed to say this) I adore the shades of pink in the icing.  It’s just such a happy colour for me (please don’t judge me), so I definitely wanted to pretty mine up and get a nice shade going.  When you get them this good-looking, they don’t even need a card that says Eat Me. 

When I picked a branch of blossom from the garden to use in the photo I didn’t imagine the tones of pink would match so well with the biscuit’s topping, but they did.  Same with the serviette - I popped it under the biscuit and wow, I love those colours. 

The “berry” in the title arose from the fact that after I’d baked the biscuits, I discovered I had NO jam.  Raiding the fridge resulted in zero jam.  Raiding the pantry unearthed old plum jam fit only for the bucket.  The thought of dropping in on the neighbours did cross my mind but I couldn’t bear their pitying looks at seeing the city girl gone country, bereft of a single pot of jam whilst their shelves bulged with homemade jams, preserve and more besides.  On the pretext of buying a newspaper, I drove to the local (and tiny) garage.  Garage owner, Phil, obviously does not make his own jams either as he had ONE jar of Craig’s Three Berry jam looking rather forlorn on the shelf.  But, hey, it was all that I needed, thanks.

I used a little blackcurrant freeze-dried powder from Fresh As to give the icing a zingy little flavour and to make a more vibrant shade.   The Three Berry jam matched beautifully.  A sprinkle of the blackcurrant powder on top of the biscuits and it all came together.  (If you don’t have access to fruity, freeze-dried powders, I have given the more standard icings and toppings below.)

It all turned out rather better than I’d hoped for.  I love those kinds of moments.


The biscuits are my entry this month to Sweet New Zealand - started by Alessandra Zecchini and also hosted by her this month.


Belgian biscuits

125g softened butter
¼ cup brown sugar
1 egg
2 cups plain flour
1 tsp baking powder
1 tsp cinnamon
1 tsp ground ginger
1 tsp mixed spice
1 tsp cocoa powder
about ¼-½-cup jam (I used Three Berry flavoured, raspberry is more common)

Cream the butter and sugar until light and fluffy.  Add the egg and beat well. 

Sift the flour, baking powder, cinnamon, ginger, mixed spice and cocoa powder together.  Incorporate the dry ingredients into the creamed butter mix until it comes together as a dough. 

On a lightly floured board, roll the dough out to about 3mm thick then use a cookie cutter (mine was 6cm) to cut out rounds. Place on a greased oven tray and bake at 180°C for 15 minutes.

When the biscuits are cold, sandwich them with the jam, then ice and top them as below.

Icing and topping

1c icing sugar
1/8 tsp Fresh As blackcurrant powder *
1 – 1½ tbsp milk
1 tsp melted butter
blackcurrant powder for topping**

Sift the icing sugar and blackcurrant powder into a small bowl. Add the milk and melted butter and stir until the icing is well combined and of spreadable consistency. Add a little more milk if it is too stiff. Spread over the biscuits. 

Sprinkle the top of the biscuits with the blackcurrant powder or coloured sugar**.


Follow these instructions if you don’t have freeze-dried powder

* Dip a cocktail stick or small skewer into red food colouring and add to the icing sugar, milk and butter mix until you have the shade you want. 


**Coloured sugar – put ¼ cup sugar in a small plastic bag and add 1 or 2 drops of red food colouring.  Rub the bag between your hands until well combined.


The biscuit base recipe comes from the Edmonds Cookbook.

Tuesday, September 18, 2012

Welsh cakes


Welsh cakes have been described as a cross between a fruit scone, a pancake and a biscuit (someone said shortbread) – and rightly so - but they have a unique taste of their own.  I can't think of anything that quite compares to them.  

Some time ago a colleague baked them one day for morning tea. Her perfectly crimped little rounds were a taste from her homeland of Wales.  I liked their simplicity, their scone-like texture, the burst of juiciness when I bit into a sultana and the sweet sugar on top.  

Well I won the Welsh test, which is not to say I am now a one-woman rugby team, but that I apparently turned out a pretty good result at my first attempt at baking them last weekend.  I took some to work on Monday and handed the Welsh one hers.  She scoffed it down with obvious delight and declared it "lovely".  She's either very diplomatic or they were very good.  Either way, I don't care.  I Iiked them so that's all that needs to be said.

These are so very simple to make so one day, when you want a change from scones or muffins, try them.  Enjoy them still warm and unadorned (except for the sprinkly sugar topping)  or with butter and jam.  My preference though is to eat them one or two days old when they are firmer and seem to have more taste.  


Welsh cakes


225g/8oz self-raising flour, sieved
110g/4oz salted butter
50g sultanas
1 egg, beaten
milk, if required
85g/3oz caster sugar
extra butter, for greasing

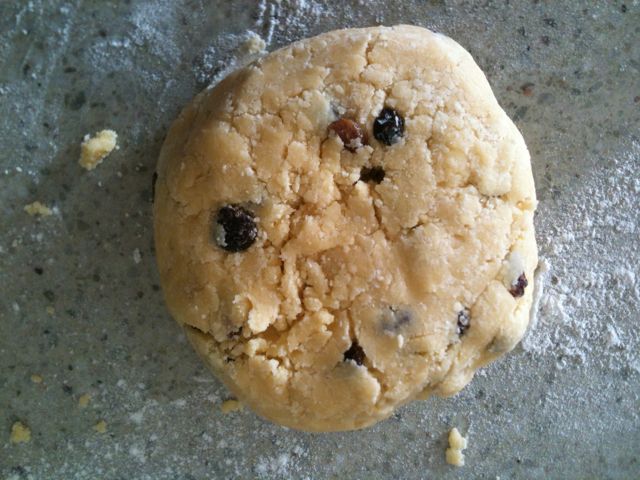
Rub the fat into the sieved flour until it resembles breadcrumbs. Add the sugar, sultanas and then the egg. Mix to combine, then form a ball of dough, using a splash of milk if needed.

I just want to pick out all the sultanas at this stage!

Roll out the pastry until it is a 5mm/1⁄4in thick and cut into rounds with a 6cm/2-2 1/2in fluted cutter. (Fluted is traditional, you can use a plain round cutter if you wish.)

If you have an old-fashioned griddle, this is ideal (I don’t, although we used to have one back home in Scotland).   Otherwise, use a heavy bottom frypan and start heating it up.  I used my Le Creuset frypan and will be using it until I’m old and frail when I won’t be able to lift it.  Smear a little dab of butter on a paper towel and rub it over the base of the frypan.  Place the Welsh cakes on the frypan and cook for 2-3 minutes each side until brown.  You may have to cook them in batches so repeat smearing the pan with butter as necessary.

Remove from the frypan and put the cakes inside a tea towel on a plate to keep warm.


While the cakes are still warm, dust the tops with caster sugar.  Eat and enjoy.