Monday, October 22, 2012

Millionaires’ Shortbread


Millionaires’ shortbread.  Those two words have been repeating and repeating in my mind over the last few days.  I blame these two here and here for doubly tempting me with chocolate treats that looked irresistible, if only I had them in front of me.  Try as I might (and I did try), I could not stop thinking of them.  The mantra would not leave me and so I indulged my hankering for things chocolate and made some of my own.  I feel good.

You may know these as chocolate caramel slices or something like that.  I’ve always known them in Scotland as Millionaires’ Shortbread and surely that perfectly describes shortbread, dressed up with layers of caramel and chocolate riches?

I make no excuses for my less than perfect serves.  I fail regularly on the "precision cutting, no smudges, marks or blemishes" type of perfection.  It is home baking after all.


Millionaires’ Shortbread
makes about 24 squares

Shortbread
175g butter, softened
75g caster sugar
250g plain flour
a pinch of salt

Caramel layer
100g butter
100g soft brown sugar (or muscovado sugar)
2 tablespoons golden syrup
2 x 375g cans sweetened condensed milk

Chocolate layer
200g good dark chocolate (over 70% cocoa) (or use milk chocolate if you prefer)


Method
Preheat the oven to 180°C/350°F.

Lightly grease and line the bottom of a Swiss roll tin approximately 33x23cm (13x9 inches).

Shortbread layer
Cream the butter and sugar together until pale and fluffy (scraping down the mixture two or three times during the mixing).

Sift the flour and salt into the mixture and bring together until a dough is formed.  Press the dough into the tin until evenly spread.  Prick the dough lightly with a fork.

Bake for 15-20 minutes or until the shortbread is firm to the touch and lightly browned (as you can see from the photo some of mine were more lightly browned than others!).

Leave to cool in the tin.

Caramel layer
Put the butter, sugar, golden syrup and condensed milk into a saucepan and heat gently until the sugar has dissolved.  Increase the heat and bring to the boil, stirring all the time.  When it reaches boiling, reduce heat and simmer gently, still stirring continuously, for about 5 minutes or until the mixture has thickened slightly.  Pour over the cooled shortbread layer and leave to set.

Note: It is important to stir continuously and not let the caramel “catch” or burn in the saucepan.  If lumps appear, remove pan from heat for a few seconds then return to simmer gently.  Remove any lumps by pouring the caramel onto the shortbread layer through a sieve.  As long as the caramel does not taste burnt (let it cool slightly before you try it!), it will be fine.

Chocolate topping
Break the chocolate into squares or pieces.  Melt the chocolate in a bowl placed over a saucepan of simmering water (don’t let the water touch the bowl) until it is smooth and there are no lumps.

Pour the melted chocolate over the cold caramel layer and leave to set.

When the chocolate is just set, cut into squares or bars.

Note:  If you like thicker layers, just add more caramel and/or chocolate the next time.  

Tuesday, October 16, 2012

Cranberry, vanilla and yogurt loaf


I was having a sloth-like morning.  Everything I touched turned to “no”.  Didn’t feel like going out, didn’t feel like baking.  Three times I started gathering ingredients for recipes and three times I put them away.  Most unproductive.  I loathe using the phrase “I can’t be bothered”, but that’s how I felt.

Later in the afternoon the apathy lifted and a sudden burst of energy resulted in this lovely loaf which wasn’t even in the running earlier.  It does have the air of a “cheer me now” cake so perhaps it was just what I needed.  Each slice has little bursts of cranberries and a taste and texture reminiscent of a madeira cake.  The icing could be optional but I urge you to spread it on.  It adds a crunch, a tang, a touch of sweetness and just makes it look way more special than an ordinary fruit loaf. 

This little happy cake is my entry to Sweet New Zealand hosted this month by the delightful Sue at Couscous & Consciousness.  


Cranberry, vanilla and yogurt loaf

100g butter
100g caster sugar
300g Greek-style (or natural) yogurt
2 teaspoons vanilla essence
250g standard flour
2 tsp bicarbonate of soda
150g dried cranberries

for the icing
100g icing sugar, sifted
1-2 tbsp fresh orange juice, sieved
pink food colouring


Preheat oven to 160°C (180°F)

Grease and line a 1kg (2lb) loaf tin. 

Cream the butter and sugar in a cake mixer until soft and fluffy (you will need to scrape down the sides of the bowl a couple of times in the process). 

Add the yogurt and vanilla and mix on lowest speed until just combined.

Sift the flour and bicarbonate of soda together and fold gently into the mix in two batches.  Add the cranberries and fold in gently (check the cranberries do not stick together in bunches).  Do not overmix.

Spoon the mix into the loaf tin.  Level the top with a palette knife dipped in a little hot water. 

Bake in the oven for approximately 50 minutes or until the loaf is golden brown and a skewer inserted in the middle comes out clean.

Leave the cake in the tin to cool completely, then ice.


For the icing

Sift the icing sugar into a bowl and add enough orange juice to make a smooth consistency, not too runny or too thick.  (Add more icing sugar if too runny or more orange juice if too thick).  Add a drop of food colouring.  I use a skewer for this and dip it into the colouring, adding enough to reach the desired colour.  Mix thoroughly until smooth and colouring incorporated.  Spread or drizzle over the cake and leave to set.

Adapted from a recipe for sour cherry yogurt cake from Gorgeous Cakes by Annie Bell.


Monday, October 8, 2012

best ever cheese scones


So here goes, you taste scones at Le Cordon Bleu cooking school (see here) and they're the best cheese scones you have ever tasted.  Everyone around you agrees so you really have to try these at home, don’t you?  Problem was I had no recipe, only a few hints and clues hastily scribbled on my iPhone. (Can you scribble on an iPhone? Yes, I think you can ‘cos it has a font that looks like handwriting.)

In my first attempt, finding the right mix was like playing Cluedo.  Was it the plain flour with the cheese in the kitchen?  No?  Perhaps the self-raising flour with the salt in the parlour?  Good job I like Cluedo.  I may not have got all three answers in the bag but I was pretty pleased with the result. I have to admit it took me five scones to figure that out.  In my defence, they were small ones.


For the second trial, I used guinea pigs in the form of two strapping lads who came inside for a coffee break after digging up the garden beds (with my permission, I might add).  This time I’d tweaked the recipe by changing the plain flour to self-raising and adding more cheese.

I have good news and bad news.  The good news is that I only ate three scones this time.  The bad news is that they were bigger scones.  I know, it’s only bad news for me.  

The even better news is that they worked.  The boys were happy, I was happy and maybe you could be happy too if you just try them, who knows?  They may not be 100% as gorgeous and perfect looking as Le Cordon Bleu’s but I think they’re still a winner. 

The secret, I think, is to:
  •  use lots of cheese (I used Vintage* cheddar)
  •  have a wet dough
  •  handle the dough as little as possible
If you make them slightly smaller, like the first batch, you don’t even need butter.  They are simply yummy! 


Best ever cheese scones

2 cups self-raising flour
¼ teaspoon salt
50g cold butter
2/3 cup cheddar cheese (I used Mainland Vintage*)
1 cup milk
extra cheese to top the scones

Heat the oven to 230°C (450°F).

Sift the flour and salt into a mixing bowl.  Either grate the chilled butter into the mix or cut it into small dices.  With your fingertips, rub the flour and butter together until it resembles breadcrumbs.  Stir in the cheese.

Mix the cup of milk in lightly and quickly using a knife or palette knife until it just forms a dough. Do not overmix.  The dough will be quite wet at this stage.

On a lightly floured board and with floured hands, gently roll the dough into a long cylindrical shape and shape into an even thickness.  If the dough feels too sticky, put a little more flour on the board and your hands – just enough to continue. Cut into rounds, big or small, and place them on a greased oven tray or a tray lined with greaseproof paper. 

Grate some extra cheese over the tops of the scones – I like to use a reasonable amount.

Place the tray near the top of the oven.  Bake for 10-15 minutes until the scones are golden brown.  Remove to a cake rack and cover with a dry tea towel to keep warm.  Serve as is, or with butter.

Best eaten warm on the day – believe me they don’t last long.

* Mainland Vintage is an aged cheddar with a crumbly texture and real bite.

For a sweet alternative, click here for cranberry & custard scones


Saturday, September 29, 2012

Very Berry Belgian Biscuits


I may have said this before but I have had less success with biscuits than any other form of baking.  Since I started this blog though I’ve been feeling happier with my biscuit baking results, particularly the Passionfruit and Monte Carlo cream biscuits from earlier posts.  Time then for another biscuit recipe.

I often see Belgian biscuits in cafes, but I suspect the uniformity in their shape, size and colour indicates they are bought in from a supplier. They always look so attractive though and I wanted to make them at home.

I like the spiciness of these biscuits and (I almost feel ashamed to say this) I adore the shades of pink in the icing.  It’s just such a happy colour for me (please don’t judge me), so I definitely wanted to pretty mine up and get a nice shade going.  When you get them this good-looking, they don’t even need a card that says Eat Me. 

When I picked a branch of blossom from the garden to use in the photo I didn’t imagine the tones of pink would match so well with the biscuit’s topping, but they did.  Same with the serviette - I popped it under the biscuit and wow, I love those colours. 

The “berry” in the title arose from the fact that after I’d baked the biscuits, I discovered I had NO jam.  Raiding the fridge resulted in zero jam.  Raiding the pantry unearthed old plum jam fit only for the bucket.  The thought of dropping in on the neighbours did cross my mind but I couldn’t bear their pitying looks at seeing the city girl gone country, bereft of a single pot of jam whilst their shelves bulged with homemade jams, preserve and more besides.  On the pretext of buying a newspaper, I drove to the local (and tiny) garage.  Garage owner, Phil, obviously does not make his own jams either as he had ONE jar of Craig’s Three Berry jam looking rather forlorn on the shelf.  But, hey, it was all that I needed, thanks.

I used a little blackcurrant freeze-dried powder from Fresh As to give the icing a zingy little flavour and to make a more vibrant shade.   The Three Berry jam matched beautifully.  A sprinkle of the blackcurrant powder on top of the biscuits and it all came together.  (If you don’t have access to fruity, freeze-dried powders, I have given the more standard icings and toppings below.)

It all turned out rather better than I’d hoped for.  I love those kinds of moments.


The biscuits are my entry this month to Sweet New Zealand - started by Alessandra Zecchini and also hosted by her this month.


Belgian biscuits

125g softened butter
¼ cup brown sugar
1 egg
2 cups plain flour
1 tsp baking powder
1 tsp cinnamon
1 tsp ground ginger
1 tsp mixed spice
1 tsp cocoa powder
about ¼-½-cup jam (I used Three Berry flavoured, raspberry is more common)

Cream the butter and sugar until light and fluffy.  Add the egg and beat well. 

Sift the flour, baking powder, cinnamon, ginger, mixed spice and cocoa powder together.  Incorporate the dry ingredients into the creamed butter mix until it comes together as a dough. 

On a lightly floured board, roll the dough out to about 3mm thick then use a cookie cutter (mine was 6cm) to cut out rounds. Place on a greased oven tray and bake at 180°C for 15 minutes.

When the biscuits are cold, sandwich them with the jam, then ice and top them as below.

Icing and topping

1c icing sugar
1/8 tsp Fresh As blackcurrant powder *
1 – 1½ tbsp milk
1 tsp melted butter
blackcurrant powder for topping**

Sift the icing sugar and blackcurrant powder into a small bowl. Add the milk and melted butter and stir until the icing is well combined and of spreadable consistency. Add a little more milk if it is too stiff. Spread over the biscuits. 

Sprinkle the top of the biscuits with the blackcurrant powder or coloured sugar**.


Follow these instructions if you don’t have freeze-dried powder

* Dip a cocktail stick or small skewer into red food colouring and add to the icing sugar, milk and butter mix until you have the shade you want. 


**Coloured sugar – put ¼ cup sugar in a small plastic bag and add 1 or 2 drops of red food colouring.  Rub the bag between your hands until well combined.


The biscuit base recipe comes from the Edmonds Cookbook.

Tuesday, September 18, 2012

Welsh cakes


Welsh cakes have been described as a cross between a fruit scone, a pancake and a biscuit (someone said shortbread) – and rightly so - but they have a unique taste of their own.  I can't think of anything that quite compares to them.  

Some time ago a colleague baked them one day for morning tea. Her perfectly crimped little rounds were a taste from her homeland of Wales.  I liked their simplicity, their scone-like texture, the burst of juiciness when I bit into a sultana and the sweet sugar on top.  

Well I won the Welsh test, which is not to say I am now a one-woman rugby team, but that I apparently turned out a pretty good result at my first attempt at baking them last weekend.  I took some to work on Monday and handed the Welsh one hers.  She scoffed it down with obvious delight and declared it "lovely".  She's either very diplomatic or they were very good.  Either way, I don't care.  I Iiked them so that's all that needs to be said.

These are so very simple to make so one day, when you want a change from scones or muffins, try them.  Enjoy them still warm and unadorned (except for the sprinkly sugar topping)  or with butter and jam.  My preference though is to eat them one or two days old when they are firmer and seem to have more taste.  


Welsh cakes


225g/8oz self-raising flour, sieved
110g/4oz salted butter
50g sultanas
1 egg, beaten
milk, if required
85g/3oz caster sugar
extra butter, for greasing

Rub the fat into the sieved flour until it resembles breadcrumbs. Add the sugar, sultanas and then the egg. Mix to combine, then form a ball of dough, using a splash of milk if needed.

I just want to pick out all the sultanas at this stage!

Roll out the pastry until it is a 5mm/1⁄4in thick and cut into rounds with a 6cm/2-2 1/2in fluted cutter. (Fluted is traditional, you can use a plain round cutter if you wish.)

If you have an old-fashioned griddle, this is ideal (I don’t, although we used to have one back home in Scotland).   Otherwise, use a heavy bottom frypan and start heating it up.  I used my Le Creuset frypan and will be using it until I’m old and frail when I won’t be able to lift it.  Smear a little dab of butter on a paper towel and rub it over the base of the frypan.  Place the Welsh cakes on the frypan and cook for 2-3 minutes each side until brown.  You may have to cook them in batches so repeat smearing the pan with butter as necessary.

Remove from the frypan and put the cakes inside a tea towel on a plate to keep warm.


While the cakes are still warm, dust the tops with caster sugar.  Eat and enjoy.


Tuesday, September 11, 2012

For the Love of Food - NZ Food Bloggers' Conference


DAY 2


If there's no chocolate in Heaven, I'm not going.
Jane Seabrook, Furry Logic Laugh at Life

After a failed attempt at finding something for breakfast en route to conference, it was straight into chocolate on an empty stomach (again), but I’m not complaining. Chocolate mark II was a sensory evaluation of premium chocolate. Jo Coffey of L’Affaire au Chocolat led us gently down the learning path and I found her pace and style well suited to an early morning audience. I was relieved to discover that it is not the chocolate one becomes addicted to, but sugar. It’s fortunate then that dark chocolate is a favourite of mine. Excellent. So, no more cravings then?


It matters
Fish and chocolate only seem to come together in chocolate fish but here at conference, sustainable fishing followed the chocolate session.  To be honest, I did not think this talk would hold that much interest for me, but what a revelation.  I was so wrong.  Rachel Taulelei of Yellow Brick Road blew me away with her drive and passion for sustainable seafood - marrying up those who catch fish with those who cook it and having seafood traceable back to where and when it was caught. An enlightening and thought-provoking talk. What a talent.


Best cheese scones ever
A taste of the light as air, but oh so tasty, cheese scones served up at morning tea by Le Cordon Bleu had me trying to replicate them back home (with some hints but no actual recipe).  I got pretty close - just needs a few tweaks and maybe I can share them.  First attempt looks something like this.


New discoveries
The Collective’s
mango yoghurt drink – I’ve not been a fan of yogurt drinks until this one.  Creamy and flavourful, I’m now working my way through the range of drinks and yogurts.  Fabulous branding too!  

Six Barrel Soda's Joseph Slater introduced us to a range of soda syrups made with filtered water, fair trade organic cane sugar, fresh fruit, spices & nuts. My favourite was the ginger syrup.  Topped with sparkling water it made for a refreshing drink.  I reckon you could add hot water and whisky for a super terrific hot toddy.  For a truly authentic soda experience, visit the café on the corner of Eva & Dixon Streets in Wellington.


Putting on the Ritzling
Who could fail to notice the elegant box in which Ritzling is packaged? That and the fact that I’d pick a Riesling over most other white wines any day should have made me try this before but, silly me, I thought it was a white wine spritzer.  Thanks to State of the Vines, Chris Archer, I learned otherwise and with one glass and a wedge of lime, I was smitten. This will be my ultimate summertime drink, but let’s not wait ‘til then.  Let’s get started now.  

Bottled happiness
Outside looking in
I had a slight disadvantage being both at the back of the crowd and beneath the air conditioning for the Little Penang and Dumpling House demonstrations but fortunately sampled Little Penang’s wonderful fare at lunch (the Nasi Lemak was outstanding) and tried my hand at making savoury and sweet dumplings with Dumpling Queen, Vicky Ha. Now all I need to know is where can I eat food like this in Auckland? 


Pastry perfection
If I thought I was in awe of actually being at Le Cordon Bleu, it was nothing compared to participating in a class with Patisserie Head Tutor, Sebastien Lambert.  With skilled hands (his, not mine) and useful tips (and oh that French accent), our happy group observed and learned.  There’s something wonderfully soothing about making pastry, both in the doing and in the watching.

Sebastien Lambert
A coffee’s finish
Normally I’d start the day with coffee but our day, and conference, concluded with a coffee tasting from Steve Barrett of People’s Coffee. I found the taste of the skillfully filtered coffee was smooth and rounded with no trace of bitterness but I can’t see me giving up my flat whites any time soon.

If only you could smell these

Just when you thought it was over ...
…another surprise, another goodie bag, this time courtesy of The Chocolate Festival. Oh happy days.


And another thank you
We certainly were spoiled over two days, so again I have to thank our sponsors and tell them how much we appreciated them.

For all sponsors, please click here.  You honestly won't regret it. 


Sunday, September 2, 2012

Fantastic fun at the Food Bloggers' Conference


DAY 1


Time to reflect on the weekend before.  My head is still full of thoughts, ideas, food, drink, conversations and gratitude that it is hard to put anything on paper.  I was overwhelmed by the generosity of sponsors, amazed at the amount of hard work from the organizers and grateful to everyone who gave their time to assist.  Thank you.  It was one of the best weekends I have ever had.

There is nothing so good as being amongst a group of people, some of whom you know and some who are strangers, knowing that you have one thing in common – the love of food.  We loved our food.  Not only did we taste and eat lots of food, we took away a huge amount in our two extremely well stocked goodie bags, thanks to our hugely generous sponsors.

Here’s what else I took away from the conference…


Is it okay to start the day with chocolate?
Well yes it is, as long as it’s GOOD chocolate.  In fact, both days started with chocolate.  Day 1 began with a dilemma.  Was I supposed to be watching the chocolate tapas demo or looking at pastry chef, Juan Balsani from Kermadec? Hmm, concentrate on the food, Lesley.  Juan's demo involved liquid nitrogen, balloons, soda siphons, spaghetti and, of course, chocolate.  Sounds weird?  You had to be there.  Methinks a visit to Kermadec is on the cards.

Demo over and a quick shift of rooms found us at the opening address of the Chocolate Festival followed by a wander around the exhibitors. 


I had to pace myself.  There were plenty of beautiful chocolate offerings (and glorious packaging) and it was hard to choose what to take home.  In my bag, I’d thoughtfully placed a small ziplock bag where I saved some free samples until they could be appreciated later – and they were. 

What would make me feel really important?
Not much could have made us feel more important than being the first foodies at the revered Le Cordon Bleu’s new premises on Manners Street, Wellington.  Rows and rows of gleaming kitchens, pots, pans, utensils and a promise of culinary excellence await young hopefuls who walk through their door.  Being there was a real buzz for me as my father (a chef) collected the entire series of Le Cordon Bleu cooking series.  I used to leaf through them when I was younger.  I may have missed my vocation but back then observing the reality of a head chef working very long and unsocial hours in hot and steamy conditions kind of put me off.  Guess I wasn’t made for it then?


Posting photos of lambs could increase my blog traffic
As soon as Jared Gulian started speaking I knew why his blog was a success.  The Moon over Martinborough man was witty and entertaining and I could have listened to his tales of city boy gone country for hours.  His talk resonated with me as I too was dragged, kicking and screaming, to the country.  Sadly, I don’t have an olive grove, but now I do have a bottle of his olive oil which he kindly gave to each of us.  Jared mentioned that he got the most traffic hits on his blog for a picture of a lamb, so here’s mine, just in case it works the same magic.

Cute lamb

Fact or fiction?
The fact is, well in New Zealand anyway, that non-fiction sells more books according to our next speaker, Alison Brook, Head of Publishing at HarperCollins NZ.  Alison’s talk of how to get published was as fascinating for it’s insight into bookselling trends as it was helpful for those wishing to write.


Getting to know you
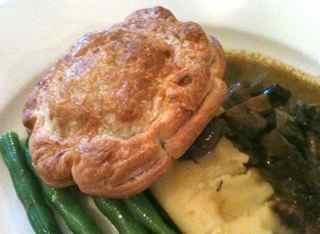
As part of Wellington on a Plate, we split into groups of four for our Friday lunch at participating restaurants.  Lucky us, we got Boulcott Street Bistro and I couldn’t have been happier.  You can’t beat good food done well and the Preston's lamb shank pithivier* with garlic beans, mash and Parkvale mushroom sauce fitted the bill.   I followed this with the ubiquitous crème brûlée – done by so many, perfected by so few – which was faultless.  The bistro is a cosy place with great ambience and friendly staff.  A beautiful copper espresso machine sat in pride of place at the bar.  Lunch was a relaxing affair where we found some quiet time to find out a little more about each other. 

*Pithivier is a round, enclosed pie usually made by baking two disks of puff pastry, with filling stuffed in between, as you can see in the second photo below.

Beetroot & feta with honey dressing for Domestic Executive

Lamb shanks main for me

About that lamb up there…
Lucy Corry from the wonderful blog The Kitchen Maid would be horrified to see a pet animal on my (mainly) food blog.  If you’re reading this, Lucy, it was only to stir up more interest in my blog (honest).  I did, however, agree with Lucy about her dislike of poor spelling, grammar and the extensive use of exclamation marks.  I have even been known to tick off my friend for her overuse of that form of punctuation on Facebook.  That said, please do not proofread this post for errors, we all make mistakes after all.

A passion for their work
One thing in common with all our speakers was their passion for their line of work or product.  I doubt anyone could be more positive about Wellington than Sarah Meikle, GM Marketing of Positively Wellington Tourism.  If the events held in August in Wellington were anything to go by, Wellington has every reason to be positive.  It seems to be alive and thriving and it was great to be a part of it, even if it was only for a long weekend.  I'll be back.

Do you see what I see?
My first breakout session in the afternoon was a Food Photography class hosted by superb photographer, Viviane Perenyi of At Down Under.  If you haven’t seen her blog, you should visit for her photos alone.  It was a pleasure to hear her speak and receive her feedback on the photos taken during her session.

There's always room for more food
Whilst it was the end of our day at Le Cordon Bleu, we weren’t finished yet. Conference dinner was a “pop up” food and wine matching evening at Floyds in Island Bay.  A gorgeous pre-dinner cocktail and mini master class started us off in the right frame of mind.  Thereafter, course upon course of tasty food came from chef Ben Barton in the kitchen, matched with wines from James Pedersen at Floriditas.  I didn’t think I could eat any more but each course provided just enough to keep me satisfied but not groaning. 


We had done so much that day, eaten so much food and heard so many wonderful speakers that it was hard to believe there was yet another day to go.  Until tomorrow then….


For all our wonderful sponsors, please click here