Showing posts with label nuts. Show all posts

Sunday, November 2, 2014

Sweet New Zealand


You may have expected a nod to Halloween from some of this month’s Sweet New Zealand entries, but surprisingly there was none. To be honest, I hadn’t given much thought to it myself relying on a long driveway in the middle of the countryside as a deterrent to any trick or treaters (I had no sweets or lollies for them, you see). My assumptions were correct and no witches, warlocks or ghosts crossed my path – at least not whilst I was awake...

Whilst they may not have run with the scary theme, our New Zealand food bloggers did a magic job conjuring up their own potions and spells for October’s Sweet New Zealand and in no particular order, here they are.

First out the cauldron was the serene Sue from Couscous & Consciousness with an Apricot, Date & Pistachio Loaf. I am always up for a fruit loaf and Sue says this delicious loaf full of dried fruit, seeds and nuts was so good she can’t wait to make it again. I can’t wait to try it, Sue.


Sue's Apricot, Date & Pistachio Loaf from Couscous and Consciousness


Not one to rest on her laurels, Sue was back in the kitchen to whip up a second entry for Sweet New Zealand and I, for one, am eagerly awaiting apricot season as this Roasted Apricot Frozen Yoghurt sounds mouth-wateringly good. If, like Sue, you have a supply of frozen apricots in your freezer (why didn’t I think of that?), then what are you waiting for? Try it now – the sun is out as I speak.


Another delicious entry from Sue at Couscous and Consciousness - Roasted Apricot Frozen Yoghurt


Next up is Genie from a super little blog called Bunny Eats Design. Genie celebrated National Nut Day on 21st October (which along with Halloween also bypassed me) with these Sugar and Spice Candied Nuts. I love taking little bowls of snacks such as these to book club – especially when you’ve made them yourself.


If you love lemons as I do, then you will probably like lemon curd (and all its amazing possibilities). You’ll be glad then that Amanda from Move Love Eat has created a Healthier Lemon Curd that is also gluten free and paleo friendly! Lots of ticks there. It must be good - Amanda has been making triple batches to keep up with the demand.


A healthier Lemon Curd from Move Love Eat


If you’re looking for a moist cake that’s a bit sweet and a bit spicy, look no further than this Sticky Prune Cake from Frances at Bake Club. Just the thing to have with a cup of tea.


Sticky Prune Cake - courtesy of Frances at Bake Club


Doing things a little differently is Sweet New Zealand founder, Alessandra. Whilst in Japan she developed her very own Tiramisu di Alessandra. (She’s Italian, so if anyone can mess around with an Italian dessert, she can.) Hers is made with cream, instead of mascarpone. The topping is Italian ground coffee, not cocoa and she finds a good quality whisky makes all the difference. Well of course it does. Salute! 


Tiramisu di Alessandra - from Sweet NZ founder, Alessandra Zecchini


My own entry is this Citrus & Almond Cake with Yoghurt Drizzle. 

That's it from Sweet New Zealand this month.  Enjoy what is left of your weekend.


Yours truly's Citrus & Almond Cake with Yoghurt Drizzle


Saturday, July 12, 2014

Energy Balls


I have become quite addicted to these, taking them to work each day to have at morning coffee break. 

Like a lot of things in life, I’ve come to these late.  By some kind of osmosis I’ve gone from barely noticing them in cafĂ© cabinets to realizing that people everywhere are making, buying or eating them. They have now seeped into my skin and I am habitually whizzing up some form of them to substitute for a muffin, which I’m presuming is a good thing, right?

I store them in the freezer and drop one in a ziplock bag on my way to work.  I favour eating them straight from the freezer as they’re chewy and dense and the eating sensation lasts just that bit longer.  Once they come to room temperature they’re softer and therefore disappear faster. 

A colleague makes a blockbuster chocoholic version of these.  Gigantic, fudgy spheres with, wait for it, a surprise square of chocolate in the centre (think Caramello or other flavoured squares of chocolate bars). Full on.

I’ve gone for a more restrained version that you can be all virtuous about eating (although, as with most things, in moderation).  Whilst it’s not a quite the same as a chocolate hit, they do deliver enough of a consolation and they are so easy to make.

These treats bear some oddball names such as amaze balls (although I think that’s actually a brand?) and the more frequent bliss balls.  Well I have to say that just sounds a bit dodgy and reminds me (not in a good way) of David Beckham’s moniker Golden Balls!  Enough of that – I’ll stick with energy balls, thank you.

Energy Balls

16 pitted and chopped dates (Medjool dates are best)
1/2 cup brazil nuts
1/2 cup almonds
2 tbsp good quality cocoa powder

zest and juice of 1 orange
a pinch of sea salt (optional)

½ - ¾ cup desiccated coconut for coating
If you’re not a fan of coconut, roll them in crushed nuts or sieved cocoa powder.

Use this recipe as a base but the possibilities are endless.  Substitute the fruits and nuts shown for other dried fruit (apricots instead of dates) and nuts; add different flavourings – after reading The Kitchen Maid’s version, I’ve taken to adding a teaspoon of orange blossom water to mine. 
If you can’t get Medjool dates (and you really want to as they are soft and thick with a sweet taste), soften hard dates (or apricots) by heating in a little water (or the juice of the orange from the recipe). If you use a little water, you won’t have to drain but to be on the safe side set aside any drained water in case you need to add to the mixture.


Grind the nuts in a food processor until fine.
Add the dates, cocoa powder, orange zest and juice and salt.
Process the mixture in the food processor until it is smooth and forms a ball.
Roll into walnut or golf-ball sized balls (your choice – I started with walnut and upsized to golf-ball.  I used a mini-ice cream scoop to measure out the balls.)
Spread the desiccated coconut on a plate and coat the balls in it.
Refrigerate for at least an hour before serving.
Store in the fridge for about 2 weeks or in the freezer.


Sunday, February 23, 2014

Date & Walnut Loaf


I have loved Date & Walnut loaf for a very long time but, with a nut allergic child in the house, it hasn’t been on the menu for a while. 

Now that the bird has flown to its own little nest, I still feel incredibly guilty for reintroducing nuts into the house.  I didn’t realize how much I missed them until I found myself dropping mini packets of peanut M&Ms (I’m not sure I actually like these but they’re so moreish) and the odd jar of crunchy peanut butter into my shopping cart, much to the chagrin of the Irish one who maintains a fierce loyalty to no peanut butter but somehow doesn’t apply it to buying bags of fresh nuts for snacking.  Go figure.

The Irish one may prefer his Barm Brack which is nice, but I think the sweet stickiness of the dates against the crunch of the walnuts make this my favourite tea loaf.

Date & Walnut Loaf


225g stoned dates, chopped
1 tsp bicarbonate of soda
a pinch of salt
300ml hot water
275g self-raising flour
100g butter, chopped into pieces
50g shelled walnuts, chopped
100g soft brown sugar
1 egg, beaten

Grease and line a 1kg loaf tin. 

Preheat the oven to 180°C.

Place the dates, bicarbonate of soda and salt in a bowl and pour over the hot water.  Set aside until cool.

Sift the flour in a bowl.  Add the butter pieces and rub into the flour until combined.  Stir in the walnuts and sugar until thoroughly combined.

Mix the dry ingredients into the cooled date mixture and beat in the egg. 

Pour the mixture into the loaf tin and bake for 1 to 1¼ hours or until a skewer inserted in the centre comes out clean.

Turn the loaf out onto a wire rack and leave to cool.

Store in an airtight tin.  The loaf keeps well and even improves with age!

And this gets shared for the first of this year's Sweet New Zealand treats hosted by Sweet NZ founder, Alessandra.


Monday, December 30, 2013

Rocky Road


I am a recent convert to Rocky Road, having never really eaten it until two years ago when a really good batch was gifted to the office.  Since then I’ve meant to give it a go.  So when all thoughts of making preserves as Christmas gifts were no longer feasible time wise, I thought of these and speedily put a few bags together the night before dishing them out as Christmas offerings for work colleagues. 

The white chocolate bars are very festive looking but that is not to say you can't make them all year round.  You can always kid yourself they’re healthy with the pistachios and cranberries. 

I made the recipe twice, once with white chocolate and once with dark and then combined the two types in cellophane gift bags.  My preference was for the white chocolate both in taste and appearance.  I suggest using a good quality chocolate as it does make all the difference.

Of course this post was supposed to be pre-Christmas but I’m sure most of you will know that last-minute seasonal panic that normally occurs and will forgive me, especially if I leave you with this quote which I pinned earlier today from Pinterest and via this site. I think it fits the bill for the coming of a new year.


Be kind
work hard
stay humble
smile often
stay loyal
keep honest
travel when possible
never stop learning
be thankful always and
...love.


Rocky Road 

250g white (or dark) chocolate, chopped
1/3 cup shelled pistachios
½ cup dried cranberries
100g marshmallows (if you're using the bigger ones, chop if you wish)

Grease and line a baking tin or Pyrex dish (approx. 15cm x 20cm), leaving an overlap of baking paper for easy removal.

Put the chocolate uncovered in a microwave safe bowl.  Microwave in bursts of 30 seconds (stirring after each burst) for about 1-2 minutes or until melted and smooth.

Mix the pistachios, cranberries and marshmallows in a large bowl.  Add the melted chocolate and stir to combine.

Press the mixture into the tin and refrigerate for about 2 hours, or until set. Cut into squares, rectangles or chunks.

I served mine straight from the fridge (summer here).


Friday, October 18, 2013

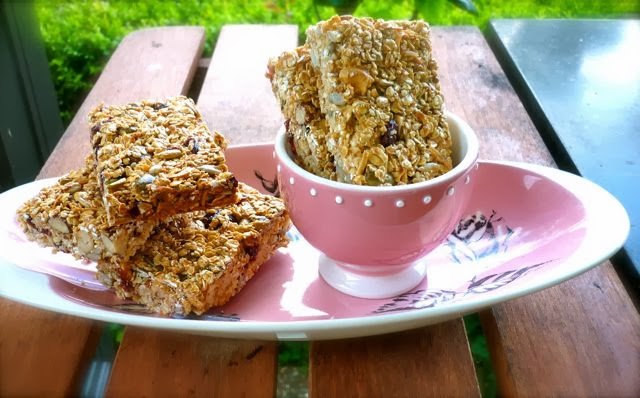
Munchy Muesli Bars


I thought the other half might appreciate these muesli bars to have on the run. He’s the (very) early riser and heads to work whilst most of us are probably deep in sleep. 

They are fairly nutritious, so easy to make, store well and you can pop them in a plastic bag or container to take to work or eat en route (providing you don’t make a mess in the car!). 

The recipe is from Nigella’s website here but I have adapted it slightly to use a mixture of my favourite nuts as I’m not a fan of peanuts (except for some bizarre current craving for Peanut M&Ms), so here’s my version below. (I also seem to get way more bars than she does.)

I have done muesli bars before but it’s been a while so I can’t really say which ones I prefer.  So you choose whether you want this healthier version which is bound together with sweetened condensed milk or the all out earlier ones which used sizeable quantities of butter, sugar and golden syrup to bind, along with a lot more dried fruit. 

When the tin was empty, Bill was left with the shop bought ones (which, I have to point out, he brought home) and it was a case of “after you’ve tried the homemade, you don’t want to go there…

Looks like a regular order then. Think I will have to make both recipes to see how they compare.

Nigella’s Breakfast Bars

1 x 395g tin sweetened condensed milk
250g rolled oats
125g mixed nuts (I used a mix of brazil nuts, cashews, almonds and hazelnuts)
50g pumpkin seeds
50g sunflower seeds
25g sesame seeds
100g dried cranberries
75g thread coconut

Preheat oven to 130 degrees C (250 F).

Grease a baking tray approximately 23 x 33 cm (9 x 13 inch). 

Line the bottom with baking paper.

Warm the sweetened condensed milk in a saucepan.

Meanwhile, mix together all the other ingredients and then add the warmed, condensed milk

Spread the mixture into the tin and press down with your hands – I use a stainless steel pastry scraper to press down evenly across the surface.

Bake for 1 hour.  Remove from the oven and leave for 15 minutes.  Cut into squares or bars – makes about 16-20 (maybe more) depending on what size you prefer.

Leave to cool completely and transfer to a tin.


Saturday, July 20, 2013

Pistachio & Ginger Slice


The kitchen hand is in danger of being fired for failing to follow instructions. He was given precise directions on size when he offered to cut this slice into pieces. I even showed him a photo from a recipe book of the desired shape and size (I’m not being anal, he’s very visual, you know).  Some time later, a baking tin arrived in front of me with a completely different take on what I’d imagined.  Hmmm.  Fortunately for him I was not in possession of a sharp knife.  His reasoning was that they'd been made (by me, I might add) for a group meeting of his camera club and the smaller size would go further and be easier to handle. And because this slice, irresistible as it is, is not for the faint-hearted and should be made for sharing, I’ll let him off – just this once.

Pistachio & Ginger Slice

Makes 20-30 
(depending on who’s cutting)
2 ½ cups standard flour, sifted 

1 cup caster sugar 

2 tsp ground ginger 

1 tsp baking powder 

250g cold butter, chopped

Ginger icing:

150g butter 

¼ cup golden syrup 

1½ tbsp ground ginger 

1½ cups icing sugar, sifted

Pistachio topping:

About ½ cup pistachios, shelled & toasted (see recipe below)

Preheat oven to 180C.
Put the flour, sugar, ground ginger and baking powder in a food processor and pulse to combine.  Add the chopped butter and process until mixture resembles fine breadcrumbs.
Press into a 20cm x 30cm tin lined with baking paper.  It will look quite crumbly at this stage but as the butter heats it comes together.
Bake for 35-40 minutes or until golden and firm to the touch.

Pistachio topping

While the slice is cooking, toast the pistachios in a dry pan over a medium heat for a few minutes, stirring frequently, until lightly browned.  Be careful not to let them burn.  Chop into smaller, but not too small, pieces and leave some whole.

Ginger icing

Put the butter, golden syrup and ginger in a saucepan over medium heat and cook for 2-3 minutes or until the butter is melted.
Stir through the sifted icing sugar and pour immediately over the slice. Refrigerate for about half an hour, then sprinkle over the pistachio topping.  Place back in the fridge and leave for about an hour or until the icing is set.
Cut into squares or slices – whatever size you want, I won’t be watching.

Slightly adapted from a basic ginger crunch recipe from Donna Hay