Showing posts with label sweetened condensed milk. Show all posts

Sunday, June 7, 2015

Sweet Caramel & Oat Slice


I must have got my baking mojo back this weekend. As well as having another batch of homemade muesli ready for the working week ahead, I've been busy baking my favourite lemon cake, this time done as a slice instead of a cake. I was on a roll by then and thought my daughter and her flatmates might appreciate a bit of homemade baking. 

I remembered this slice.  I pestered someone for the recipe after tasting it at work many years ago. A mother had made it for a school camp, or some other trip. I'm not sure (or don't remember!) how it found its way to the staff room but I'm glad it did. It's a wonderfully gooey mix of crunch and caramel that we all fell in love with that day and still tastes as good as I remember.


Sweet Caramel & Oat Slice

Makes approximately 24 small slices

For the filling
385g tin sweetened condensed milk
50 grams butter
2 tbsp golden syrup

For the base
175g butter, softened
1/4 cup caster sugar
1 tsp vanilla essence
1 1/2 cups standard flour
1/2 cup rolled oats


Place the condensed milk, butter and golden syrup in a medium sized saucepan and stir over a low heat for about 5 minutes until the butter has melted and the mixture is golden. Leave to cool.

Preheat the oven to 180 degrees C.  Grease and line a 23cm x 23cm slice tin with baking paper.

In a cake mixer, or by hand, beat the butter, sugar and vanilla together until pale and creamy. Sift the flour into the mixture, along with the oats and mix them in until incorporated. The mix will be moist and crumbly.  

Press three-quarters of this mix into the base of the prepared tin, ensuring you have an even surface without gaps.

Pour over the caramel filling and spread out evenly with a palette knife. 

Scatter the remaining quarter of the crumble evenly across the top.

Bake for 30-35 minutes or until golden.

Cool in the tin for 15 minutes.  Transfer to a wire rack to cool (you should be able to lift out the whole lot by holding onto the overlap of baking paper.  You can refrigerate it for a few hours or overnight and it will be easier to slice.

Once cool, cut into small slices or squares. You don't need to cut the slices too large as it is quite rich. 


Saturday, September 20, 2014

Creme Caramel - slow baked


I have had a severe multi-dose of procrastination, indecisiveness and writer's block - all of which I am going to use as my excuse for the long gap from the last post. It's not all hopeless. I got over the indecisiveness when I ticked the voting paper today for the NZ general election.  I also knew whether I would have voted aye or nae for Scottish independence but sadly expat Scots, who really still care about their beloved country's future, were not given the vote.

Back home when I was a child I would not have given the vote to creme caramels.  I hated them with a passion and don't remember why.  I think it was just the taste, which is everything really.

Late last year in Ortolana restaurant, I ordered a salted caramel flan and got it into my head that I was ordering a pastry tart filled with custard and strawberries (I know, I'm a little mixed up at times). I had to be convinced I had ordered it when it arrived and glumly tried it.  It was nice in the way that it was better than I'd expected but wasn't quite what I'd had in mind.

So it still seems a little strange that I'd want to make these creme caramels, but I had half a tin of sweetened condensed milk I wanted to use and, bingo, saw this recipe and thought "why not?". (Be assured I don't vote for political parties in the same flippant manner.)

The result is that the caramel sauce worked (I thought I'd burnt it at first), the custard set, they were easy to bake and looked pretty good (but would look much prettier with some added decoration e.g. fresh or marinated strawberries which I didn't have). 

Once baked, they just had to languish overnight in the fridge. Ideal for do-ahead desserts. Oh, and I did like them and can't imagine why I didn't before?

Creme Caramels

Makes 4

1/2 cup sugar
2 large eggs
1 1/2 cups milk
1/2 a 400g tin of sweetened condensed milk
1/2 tsp vanilla essence

Turn your slow cooker onto the HIGH setting.  Pour in 2 cups of hot tap water.  

Lightly spray or grease 4 ramekins, cups or small bowls (which can hold 3/4 cup of water). Check beforehand that they fit in the slow cooker (I used two upturned tiny soy sauce bowls to allow two of the ramekins to be at a different level so they would all fit in).

For the caramel: Heat the sugar over moderate heat in a medium saucepan, preferably with a pouring spout.  DO NOT STIR.  Tilt the pan carefully to ensure all the sugar melts evenly and turns golden brown. As soon as it reaches that stage and still without stirring, pour equal amounts into the bottoms of the ramekins.

Place the eggs, milk, condensed milk and vanilla into a mixing jug or bowl and beat until combined but not frothy. Pour this mixture through a fine sieve into the ramekins.

Carefully place the filled ramekins into the slow cooker.  Put the lid back on the slow cooker and turn the setting to LOW. Cook for 4 hours or until custards set.

Once set, turn off the slow cooker and carefully lift out the bowls.  Cover with plastic film and leave overnight in the fridge.  Remove from the fridge half an hour before serving.

To turn out the custards, run a small palette knife or similar, around the top.  I turned them out onto a flat, stainless steel pastry scraper so I could easily transfer them to a serving plate. Otherwise you can scoop them out onto your hand (I did not trust myself with this!).

And there you have it, a caramel topped custard with a pool of caramel sauce.

Recipe from Slow Cookers & Crockpots by Simon & Alison Holst


This is my entry for September's Sweet New Zealand hosted by Karen at Mummy Do It (I remember those words!).


Friday, August 22, 2014

Chocolate & Hazelnut Caramel Slice


Chocolate & Hazelnut Caramel Slice 

Well, here I am on my wonderful work-free Friday.  Work, that is, in the paid sense.  The other unpaid kind is what’s eating away at my day today.  That, and the incessant pull of social media just in case I’m missing something interesting. I often wonder how I get more done when I have less time at home but I already know the answer. So I’ll just call it pottering and look upon it as a form of relaxation.

I’ve been listening to a radio discussion on Retired Husband Syndrome (RHS) that made me laugh out loud. A study has found that many women with a retired husband at home suffered stress related symptoms such as insomnia, headaches and depression (and presumably extra work cleaning up after the husband’s “bright ideas” or projects?).  As I was chortling away (in my defense, it was presented in a humorous tone), a certain thread of trepidation crept in, making me realize I too would find it difficult not to have my cherished “home alone” time. It’s a long way off but I am thankful then to have a large shed where he can mess around until his heart is content and I won’t be setting foot in or cleaning it.  Whew!

One thing I did achieve today was making this slice.  I’d been thinking of driving 20 minutes to experience a similar one at a local cafĂ© but decided to stay put, brew a good coffee and make this using some leftover chocolate ganache and sweetened condensed milk I had in the fridge.  I’m glad I did.

The recipe comes from the Little & Friday cookbook given to me as a Christmas present last year. Eight months later, I hadn’t baked one single thing from it so it was time to change that. 

It’s a wonderfully gooey, fudgy, chocolate slice.  I expected it to be similar to Millionaire’s Shortbread (my recipe here) but the chocolate base and caramel & hazelnut filling are both different and gorgeous and I love the hazelnuts. Not surprisingly it’s an “in demand” best-seller for Little & Friday.

I'm entering this for Sweet New Zealand, hosted this month by Munch Cooking.


Chocolate & Hazelnut Caramel Slice 

Base

175g butter, softened
2 cups icing sugar
½ tsp vanilla essence
1 egg
½ cup good quality cocoa
1½ cups plain flour
½ tsp salt

Filling

2 x 395g tins sweetened condensed milk
200ml golden syrup
100g butter
1 cup roasted hazelnuts*, chopped

Topping

¾ cup chocolate ganache

*To roast hazelnuts, heat oven to 180°C.  Place hazelnuts on a baking tray and bake for 10 minutes.  Leave to cool.  Rub hazelnuts briskly in a tea towel to remove the skin and chop into about quarters.

Method 

Preheat the oven to 150°C. Grease and line a 25cm square tin (leave an overlap of baking paper lining for easier removal from tin).

Place the butter, icing sugar and vanilla in a cake mixer and beat until light and fluffy.  Add the egg and beat until well combined. Sift the cocoa, flour and salt together and add to the mix, again until well combined.

Press the mix firmly and evenly into the base of the baking tin.  Bake for 10-15 minutes in the centre of the oven.

While the base is cooking, prepare the filling by combining the condensed milk, golden syrup, butter and hazelnuts into a saucepan.  Heat slowly over a low heat then pour over the cooked base. 

Return the base and filling to the oven and cook for a further 15 minutes or until set.  Remove from the oven and leave to cool.

Once cool, spread a thin layer of hot chocolate ganache over the top.  I removed the base and filling from the baking tin before I spread the ganache on top.

Once the ganache has set, use a sharp knife to cut into squares or slices. Dip the knife in hot water and wipe off with paper towel between each cut for easier slicing.


Ganache (makes 1 cup – use ¾ cup for above recipe) 

200g good quality dark chocolate (I use Whittaker’s 72% Dark Ghana)
½ cup cream

Gently melt the chocolate and cream in a metal bowl over a saucepan of simmering water (the water should not touch the bowl).  Stir until melted and smooth.  Leave to cool and thicken. 

Leftover ganache can be stored in the fridge for up to two weeks (or eaten by the spoonful if you are so inclined!).


Friday, October 18, 2013

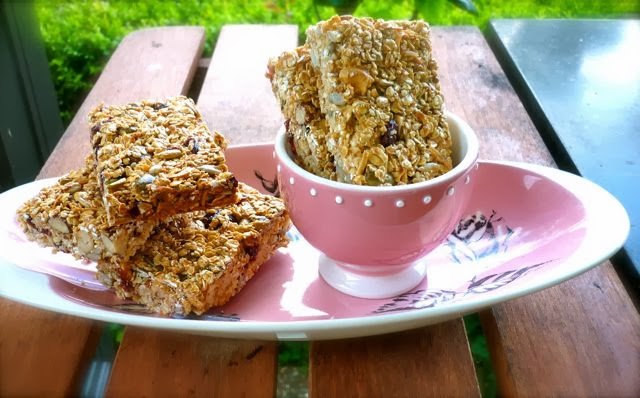
Munchy Muesli Bars


I thought the other half might appreciate these muesli bars to have on the run. He’s the (very) early riser and heads to work whilst most of us are probably deep in sleep. 

They are fairly nutritious, so easy to make, store well and you can pop them in a plastic bag or container to take to work or eat en route (providing you don’t make a mess in the car!). 

The recipe is from Nigella’s website here but I have adapted it slightly to use a mixture of my favourite nuts as I’m not a fan of peanuts (except for some bizarre current craving for Peanut M&Ms), so here’s my version below. (I also seem to get way more bars than she does.)

I have done muesli bars before but it’s been a while so I can’t really say which ones I prefer.  So you choose whether you want this healthier version which is bound together with sweetened condensed milk or the all out earlier ones which used sizeable quantities of butter, sugar and golden syrup to bind, along with a lot more dried fruit. 

When the tin was empty, Bill was left with the shop bought ones (which, I have to point out, he brought home) and it was a case of “after you’ve tried the homemade, you don’t want to go there…

Looks like a regular order then. Think I will have to make both recipes to see how they compare.

Nigella’s Breakfast Bars

1 x 395g tin sweetened condensed milk
250g rolled oats
125g mixed nuts (I used a mix of brazil nuts, cashews, almonds and hazelnuts)
50g pumpkin seeds
50g sunflower seeds
25g sesame seeds
100g dried cranberries
75g thread coconut

Preheat oven to 130 degrees C (250 F).

Grease a baking tray approximately 23 x 33 cm (9 x 13 inch). 

Line the bottom with baking paper.

Warm the sweetened condensed milk in a saucepan.

Meanwhile, mix together all the other ingredients and then add the warmed, condensed milk

Spread the mixture into the tin and press down with your hands – I use a stainless steel pastry scraper to press down evenly across the surface.

Bake for 1 hour.  Remove from the oven and leave for 15 minutes.  Cut into squares or bars – makes about 16-20 (maybe more) depending on what size you prefer.

Leave to cool completely and transfer to a tin.