Monday, October 28, 2013

Simply Summer Strawberry Ice Cream


I was in the garden this morning clad in one layer, shorts included (I’ve spared you the photo).  Two hours later, I’m wrapped in three layers including old, but comfy, woolly cardi and long track pants.  Such is the contrary weather we are experiencing at the moment. It could be worse, I could be in the South Island where there have been snowfalls. Hello summer!

On a recent hot and summer-like day, I spied some strawberries locally and knew it was time for ice cream. It was summer in my heart just thinking about it.  I have been a fan of ice cream for a long time thanks to my dad. Each Sunday he would cycle (yes, cycle) several miles to the famous Luca’s (Edinburgh and Scotland have a lot to be thankful for with their wealth of Italian ice cream stores) and bring home a tub of ice cream, strapped to the back of his bike.  When it was finished, the cats (sorry, Lucy) got to lick the empty carton and lid.  Gourmet ice cream lickin’ cats – how spoilt they were.

Whilst this ice cream can’t match the rich creaminess of Luca’s it does have a glorious colour and three simple ingredients - strawberries, cream and sugar – the taste of summer.

Just remember to freeze the strawberries in advance, otherwise you’ll have to wait a few hours before satisfying your craving.

Strawberry ice cream

Serves 4

If you’re serving this with something, have everything ready and work quickly as the ice cream melts fast.

2 cups strawberries, hulled and quartered
½ cup icing sugar
½ cup pouring cream


Place the strawberries in a plastic container and freeze.

Empty frozen strawberries into a food processor (you may need to break them apart if they’re stuck together but do this quickly to keep fruit frozen) and process until finely chopped.  Add the icing sugar and process until well combined.  Keep the motor running and add the cream until you have a smooth ice cream (wipe the sides of the bowl down with a spatula once or twice to blend).  Serve immediately.


You might also want to try this 


Friday, October 18, 2013

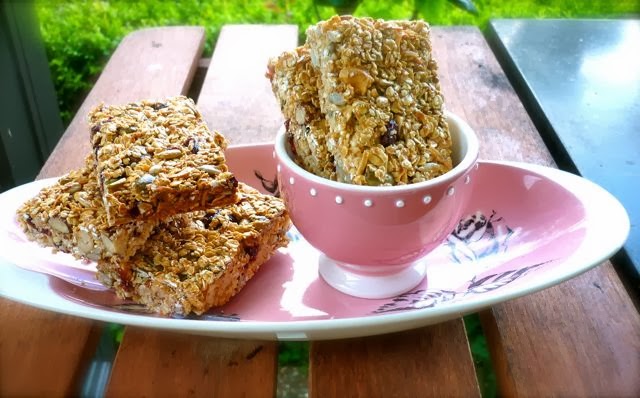
Munchy Muesli Bars


I thought the other half might appreciate these muesli bars to have on the run. He’s the (very) early riser and heads to work whilst most of us are probably deep in sleep. 

They are fairly nutritious, so easy to make, store well and you can pop them in a plastic bag or container to take to work or eat en route (providing you don’t make a mess in the car!). 

The recipe is from Nigella’s website here but I have adapted it slightly to use a mixture of my favourite nuts as I’m not a fan of peanuts (except for some bizarre current craving for Peanut M&Ms), so here’s my version below. (I also seem to get way more bars than she does.)

I have done muesli bars before but it’s been a while so I can’t really say which ones I prefer.  So you choose whether you want this healthier version which is bound together with sweetened condensed milk or the all out earlier ones which used sizeable quantities of butter, sugar and golden syrup to bind, along with a lot more dried fruit. 

When the tin was empty, Bill was left with the shop bought ones (which, I have to point out, he brought home) and it was a case of “after you’ve tried the homemade, you don’t want to go there…

Looks like a regular order then. Think I will have to make both recipes to see how they compare.

Nigella’s Breakfast Bars

1 x 395g tin sweetened condensed milk
250g rolled oats
125g mixed nuts (I used a mix of brazil nuts, cashews, almonds and hazelnuts)
50g pumpkin seeds
50g sunflower seeds
25g sesame seeds
100g dried cranberries
75g thread coconut

Preheat oven to 130 degrees C (250 F).

Grease a baking tray approximately 23 x 33 cm (9 x 13 inch). 

Line the bottom with baking paper.

Warm the sweetened condensed milk in a saucepan.

Meanwhile, mix together all the other ingredients and then add the warmed, condensed milk

Spread the mixture into the tin and press down with your hands – I use a stainless steel pastry scraper to press down evenly across the surface.

Bake for 1 hour.  Remove from the oven and leave for 15 minutes.  Cut into squares or bars – makes about 16-20 (maybe more) depending on what size you prefer.

Leave to cool completely and transfer to a tin.


Monday, October 7, 2013

Lemon & Raisin Friands


I’ve been a bit of a cake-baking machine recently to the point that I am almost over anything sweet (almost).  

In one weekend of two birthdays, I managed to produce one birthday dinner, three birthday cakes (for two different occasions) and a warm lemon tart.  I’m exhausted just thinking about it again.

It was all a bit stressful but everything turned out well in the end - even after a slight hitch where the top of one of the cakes resembled the gradient of a skate park.  After levelling it off and covering it with chocolate frosting it looked fine.

All that activity pretty much explains the gap between the last post and this one.  However at some stage in the last few weeks I was watching Masterchef Australia (how sad is it that my life was on hold between 4.30 and 5.30pm for two months during this time?) and there was a Masterclass on how to make the perfect friand. Remembering I’d bought a friand tin which had not been christened by actual friands, I decided to give it a go. 

On a side note, I’m thinking there should be a cook along with Masterchef so it becomes more interactive and I don’t feel like a sloth on the couch who, as the credits roll, can’t be bothered thinking what to cook for dinner.  What do you think?

As for the friands, well I don’t normally eat a lot of friands (auto-type keeps trying to correct it to “friends” and I have to say I don’t eat a lot of friends either!) but I can’t help thinking that these definitely tasted more “eggy” in a good way (no surprised there considering the amount of egg whites).  It made me wonder if those I’ve had outside were really muffins in disguise, or maybe they used less eggs?

Apparently, according to Masterchef, friand is French for delicate. In my French dictionary it’s dainty and that’s how I see them – perfect to have with a cup of tea. 

They are quick and easy to produce and I would probably make them more often if I didn’t have to plan what I was going to do with 8 egg yolks.

The original recipe is on the Masterchef website.  I didn’t go down the whole route with the sticky raisin topping so the recipe below is slightly altered.

If you’re really pushed for time, just sprinkle unadulterated raisins (or even sliced, toasted almonds or lemon rind) on top.


Lemon & Raisin Friands

8 egg whites
120g ground almonds
120g standard flour, sifted
250g icing sugar, sifted
a pinch of salt
200g butter, melted

Topping
½ cup raisins
1 fruity flavoured tea bag
a splash of Limoncello

Preheat oven to 180°C. 

Grease or spray a friand tin (use a muffin tin if you do not have a friand tin),

Lightly whisk the egg whites until frothy. 

In another bowl, combine the ground almonds, flour, icing sugar and salt.  Make a well in the centre and pour in the egg whites.  Fold until well combined and the batter is smooth.  Set aside for 10 minutes.

Put raisins, tea bag and a splash of Limoncello in a small saucepan with just enough water to cover and simmer gently for 5-10 minutes until raisins are plump.  Remove from the heat and allow flavours to infuse for 15 minutes then drain the raisins.

Spoon the batter into the friand tin until three quarters full.  Add a teaspoon or two of the raisins on top of each friand. 

Bake for 15 minutes or until cooked through. 

Remove from oven and leave in the tin for 5 minutes before removing to a wire rack to cool completely.  Once cold, dust with icing sugar.


Friday, September 13, 2013

Etcetera ... Weekend in Wellington


Almost a year to the date since my last stay, I was back in Wellington for the weekend.  This time it was for a work conference so I stayed on for the weekend and Bill joined me. 

I was happy with whatever weather Wellington was going to throw at me, as long as there were no earthquakes.  So, thank you – the ground stayed still and I got a mixed bag of cold & wet and warm & sunny. 

I also got a cold, starting with a sore throat before I hit the airport for the early morning flight.  I am pleased to say it didn’t affect my tastebuds so I was able to indulge in all things food, starting with chocolate and a visit to the Bohemein chocolate store on Featherston Street.  We saved these until we got home when we realized we’d bought far too few but oh some of those flavours – lemon and thyme ganache (top left) or balsamic vinegar and honey ganache (bottom left), all with silky smooth chocolate.  Good thing one can order online.

Ombra

After a wander around the streets on a cold and wet early Friday evening, we were happy to open the doors to the warmth and conviviality of Ombra.  Lack of sleep and my head cold meant an early dinner which was just fine as 5pm dining means you get a table straight away!

Some wait people you just fall in love with.  Earlier in the day at conference we had a workshop on assertiveness training.  This waitress needed none of that.  Warm and assured she led and cajoled us through the menu.  No, we were not to have that choice, she firmly opined, she would bring us something else. Everything she presented was perfect.  

Polenta chips

We kicked off with the Polenta Chips with fried sage leaves followed by Baccala (salt cod) Crostino and then Beef meatballs with Capers and Chickpea Puree.  A little breather before the San Marzano Tomato, Fior di Latte and Basil pizzette which was so good that we ordered another pizzette - under strict instructions from our waitress that it would be the Coppa, Artichokes and Mint this time.  Bill managed to fit in a chocolate and caramel mousse whilst, in a rare moment, I was no longer Miss Sweet Tooth. Warmed, fed and watered we forsook the rest of Wellington’s nightlife and headed back to the hotel feeling well pleased with our choice.

San Marzano pizzette

Early to bed means (mostly) early to rise and I couldn’t resist a return visit to Floriditas for breakfast where it was eggs all round.  Scrambled eggs on toast with vine tomato salad for me and ham off the bone and poached eggs with hollandaise for Bill.  Personally I prefer my scramblers cooked a little less set than theirs but there was plenty to sustain us for more walking around the city.

Floriditas

Bill's eggs with mine just visible in the background

I was hoping to bump into fellow food blogger, Shirleen and I did at the City Market on Sunday morning.  Whilst I had a craving for a bacon buttie, her recommendation made me opt for dumplings instead.  Dumplings for breakfast is way out of my comfort zone but these were exceptional - only to be expected of course coming from Vicky Ha of The Dumpling House.  


I settled down to a plate of Nepalese Spiced Lamb Five Veges; Korean Sesame Beef Sprouts; Crystal Prawn Garlic Chives and Shanghai Pork Savoy Cabbage topped off with sesame chilli oil and kasundi whilst Bill joined the long queue for the other recommendation - a hearty bowl of ramen noodles from The Ramen Shop.

A young helper making noodles
Ramen noodles

Over the weekend, we shopped (for the record, Bill bought more than me); visited Te Papa; the City Gallery; explored the waterfront; went to Moore Wilson; walked the Botanic Gardens via the Cable Car. I really enjoyed a tour of the Beehive as part of the conference. We caught up with family on Saturday night over dinner at their house, which was lovely.  I didn’t get to all the places I had on my list but there’s always another time, isn’t there?


Friday, August 23, 2013

Chocolate Caramel Banoffee Tarts


Fridays, I have off.  I have had to train myself to go and do something I enjoy on these days otherwise  I can fritter the time away at home accomplishing what feels like nothing (even though it is not).  So I took off today to Ruben in Parnell Road.  Except I couldn't find it (incorrect street number on referring blogs) even though I wandered up and down a few times.  Fortunately I'd already spied Vaniye where I'd purchased some croissants for the weekend so I returned for a second time that morning and sat in their small but tastefully elegant space with a crisp, buttery almond croissant in all its gorgeousness and a good coffee.

Later I headed across town to the Capitol Cinema to take in the movie, Frances Ha, which I'd spotted but not had a chance to get to at the recent Auckland Film Festival.  It was funny to hear the elderly woman behind me commenting at the closing credits "well that was a lot about not much at all".  We were probably not the film's target audience age group really but the lead actress plays her part so endearingly well that she won me over.  Filmed in black and white and with nods to Woody Allen, it was amusing and sometimes awkward as it follows the late-twenties Frances as she tries to find her way in life (and homes).

What all this has to do with chocolate banoffee pies, I have no idea, except I had no other way of introducing them so I decided to waffle on about what I'd done today.

After our food bloggers' afternoon tea, I promised I'd share this recipe so here it is. This is the first time I've ever made banoffee pies (or in this case, chocolate caramel banoffee tarts) but I can assure you it will not be the last.  They are very tasty and not too decadent as they are only a mouthful or two!

If you make the tart shells ahead of time (they will keep for a couple of days in an airtight tin) it makes for a reasonably easy assembly on the day of eating.  I am sure they will also freeze well too.

The recipe used mini-muffin tins for cooking.  However I found these made tiny cases that were too small for the filling and the pastry too thick so I used tart tins.  Leave the banana slices and cream topping until you are ready to serve (brushing a teensy bit of lemon juice on the banana will stop it from  browning).

I'm sharing this recipe at Sweet New Zealand, hosted this month by Sweets & Brains.


Chocolate Caramel Banoffee Tarts


1 1/2 cups (225g) plain flour
1/4 cup (40g) icing sugar
1/4 cup (25g) cocoa powder
185g (6oz) cold butter, chopped coarsely
1 egg yolk
2 tsp iced water
1 small banana
1/3 cup (80ml) whipped cream

chocolate caramel filling


60g (2oz) butter, chopped coarsely
1/4 cup (55g) brown sugar, firmly packed
1 cup (300g) sweetened condensed milk
30g (1oz) good quality dark chocolate, chopped coarsely
2 tsp golden syrup or treacle


Place the sifted flour, sugar, cocoa and butter in a food processor and process until crumbly.  With motor running, add egg yolk and enough of the iced water to make ingredients cling together.  Turn the dough onto a floured surface (it will be still be crumbly) and knead gently until smooth.  Wrap in plastic and refrigerate for 30 minutes.

Grease two 12-hole tart tins.  Roll out half the pastry between two sheets of plastic wrap or baking paper until just under 5mm (1/4 thick).  Cut out rounds to fit the holes in your tart tins (use the thin rim of a round wine glass or drinking glass to cut if you don't have anything else - just not your expensive crystal and a heavy fist!).

Ease the pastry neatly into the holes.  Repeat the process with the other half of pastry.  Prick the bases of the tarts with a fork and refrigerate again for 30 minutes.

Preheat oven to 220 degrees C.  Bake cases for about 12 minutes - watch carefully to ensure the tops do not burn.  Remove from the oven and leave in the tins for 5 minutes before removing to a cake rack to cool.  The cases can be made two days ahead.  Store in an airtight container if you are not going to use immediately.

chocolate caramel filling


Stir the butter and sugar in a small saucepan over a low heat until the sugar dissolves.  Add the condensed milk and stir for 5 minutes or until the mixture boils and thickens (make sure it does not catch on the bottom of the saucepan).

Remove from the heat and stir in the chocolate and golden syrup (or treacle) until smooth.  Remove from the heat.

Divide the hot caramel filling into the pastry cases.  Leave to cool and then refrigerate for 1 hour.

When ready to serve, place a slice of banana on top of each tart (brush very lightly with lemon juice if they will be sititng for a while - this stops the banana going brown) and then either pipe or dollop some whipped cream on the top.  Dust with sifted cocoa powder if you wish.


Sunday, August 11, 2013

Etcetera ... Afternoon Tea in the Country


Excuse me while I just ease or squeeze myself into the comfy trackpants and settle on the couch for a rest. I've just had afternoon tea with some food bloggers here at my home and there was so much good food that I am fit to burst. I didn't quite manage to taste everything but I have a little stash to try at work tomorrow. Well, there's got to be some good bits about a Monday back at work, isn't there?

I've "known" (in the blogging sense) Arfi since I first starting reading food blogs a few years ago and I finally got to meet her today.  Arfi blogs at HomeMadeS and arrived not only with some unusual little treats but a box of her homegrown limes and cartons of eggs for the rest of us to make use of.  Thank you Arfi, it was a pleasure to have you here.

Arfi didn't have too far to come as she lives nearby.  The others, making the road trip from Auckland, were:

Mairi, fellow Scot and author of Toast.

Alli of Pease Pudding and busy baker at her Pop Up Patisserie in Waimauku, as well as blogging and cookery classes when she has time!

Carmella at Easy Food Hacks.

Gillian from So So Simple.

Thanks for your lovely contributions and company.

The air was afresh with citrus notes. Mairi had delved into Ottolenghi's Jerusalem and baked a loaf bursting with flavours of orange marmalade and coconut.  In a similar, yet different, vein, Carmella produced a moist orange almond cake.  Alli had little iced lemon polenta cakes, luscious little lemon tarts and chocolate raspberry tarts. Gillian brought a crunchy chocolate slice and Arfi tempted us with some exotic looking delights.


In a state of doubt as to whether anything I made would succeed, I attempted two recipes, the star of which were some mini chocolate banoffee tarts.  Next up on my list were vanilla cupcakes with an apricot cream cheese icing.  The swirls on the cupcakes were thanks to this tutorial on Lydia Bakes - by far the quickest, simplest, easiest and most successful icing tutorial I have ever watched.  I was pleased with the results.


Alli was bemused with me for using recipes to make sandwiches but I swear these are the best cucumber sandwiches I have ever made and the salmon and herb cream cheese ones came a close second.


Most of us drank tea and I picked Twining's New Zealand Earl Grey which is a fragrant bergamot tea with orange blossom.  So refreshing, I managed four cups served in Bill's grandmother's tea set making its first official outing here. I think the plates matched the salmon very well.

Watch out for upcoming posts on those banoffee tarts and cupcakes (the sandwiches might get a look in too).


Saturday, July 27, 2013

Mocha Mousse & Caramelized Oranges


When I was younger I’d take the cut half of an orange and dip it straight into the sugar bowl. I assume mum wasn’t watching at the time although, given my sweet tooth, it may have been something she encouraged.

I was tempted to do a similar thing with our latest crop of oranges just to sweeten them up a little.  They are just a tiny bit tart to eat au naturel.   

A quick flick through an old cookbook and I came up with these retro caramelized oranges – a little sticky syrup to sugarcoat the citrus.

From there it wasn’t too hard to think of a chocolate match – or in this case chocolate and coffee – for a winning combination.  Oh, and did I mention there’s also lemon liqueur, for a little extra citrus kick?  This mousse really has a lot going for it. 

The caramel sauce turned out less sticky than it was originally.  I am going to suggest that this was the result of it mingling overnight with the juice from the oranges and not another unsuccessful attempt at a toffee sauce by me.  It didn't matter, the rich, dark mocha mousse was heaven.

This will be my entry to
Sweet New Zealand hosted this month by the talented Nicola who has a wonderful blog at Homegrown Kitchen.


Mocha mousse & caramelized oranges

Makes about 6-8 serves

175g (6oz) dark chocolate, at least 70% cocoa
2 tbsp strong black coffee
4 eggs, separated
1 tbsp Limoncello or Cointreau liqueur

Mocha Mousse


Break chocolate into pieces and place the chocolate and coffee in a heatproof bowl over a pan of simmering water.  Do not let the water touch the base of the bowl.  Heat gently until the chocolate melts, stirring occasionally.  Remove from the heat and allow to cool for a couple of minutes.

Beat the egg yolks and gradually stir into the chocolate mixture.  Add the liqueur and stir to combine.

In a clean mixing bowl, beat the egg whites until stiff with an electric mixer. Now, using a metal spoon, fold a tablespoon of the egg whites into the chocolate mixture to loosen it.  Gently fold in the rest of the chocolate mix into the egg whites until thoroughly combined. Be patient, it needs gentle folding and cutting movements to retain all the air, which makes the mousse light.

Spoon into individual ramekins or glasses and chill in the fridge for several hours, preferably overnight.

Serve with the sticky oranges on the side or on top and some whipped cream.

Caramelized oranges


4 oranges
115g sugar
150ml water

Using a sharp knife, peel and remove the pith of the orange, keeping the shape intact.  Slice into rounds, remove the pips and set aside.

Place the sugar and half the water in a saucepan and dissolve the sugar slowly over a gentle heat.  Once dissolved, increase the heat and boil until it turns a rich, caramel colour.

Remove the pan from the heat and immediately pour in the remaining water being careful not to splash any of the hot caramel. 

Return the pan to a gentle heat and dissolve the caramel.  Remove from the heat and leave to cool before pouring over the oranges.

Chill in the fridge before serving.

If you don’t want to serve the mousse with the oranges, a chocolate coated coffee bean or two on top finishes it off nicely.