Friday, July 27, 2012

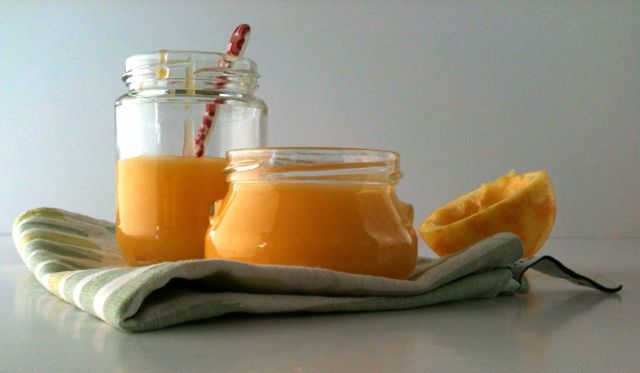
luscious lemon curd


Lemon curd (also known as lemon honey) is so easy to make that if you haven’t made it before, you should really give it a go.  It can be cooked in a saucepan, but this microwave method is super quick and easy.

Although, I have lemon trees at home, they won’t be winning any beauty competitions with their gnarled, imperfect skins.  Their appearance kind of makes it difficult sometimes to get good-looking zest - and we all want good looking zest don’t we?  Well, yes we do in lemon curd, otherwise we get flecks of green and black in the jar, which ain’t so pretty.  So when a bag of unblemished lemons came into my being, I knew right away I would be making lemon curd and preserved lemons. I was assured the lemons were organic (really? They looked so perfect?).  

For a long time I only purchased lemon curd at craft fairs where little old ladies had probably been making it for years. Since I discovered it’s simple to make, I’ve been making it at home. This recipe comes from a grandmother, a former colleague, and is just delicious.

There are lots of things you can do with lemon curd.  The most temptingly obvious is spooning it direct into one’s mouth. In fact, it’s quite likely you’ll eat the whole jar.  I thought I was the only one with this weak trait, but a colleague told me she’d been doing the very same thing. 

Assuming you resist the temptation, try spreading it on toast, bagels, or fill sweet pastry tarts with it.  It’s divine swirled through vanilla ice cream or as a filling in sponges, muffins and cupcakes. I dolloped a teaspoonful on a slice of lemon, banana and sultana cake to lift its’ slightly dry texture.   Or just package up the jars pretty and give as a gift – the recipient will love you forever.

Next time, I’ll be writing about the lemon louise slice I made using the lemon curd.


lemon curd

6 eggs, well beaten
125g (¼ lb) butter, cut in chunks
500g (1lb) sugar
Grated rind of 2 lemons
Juice of 3 lemons, strained


Wash and sterilize about 4 or 5 glass jars (how many you will need depends on the size of the jars – I tend to use smaller ones).  I sterilize by washing the jars and lids in hot, soapy water, then rinse the jars while still wet and put them (without the lids) in the microwave for one minute.  Use boiling water from a kettle to pour over the lids to sterilize.

Place all the ingredients in a large microwaveable jug and stir.  Heat the mixture for 30 seconds in the microwave and stir again.  It will start off looking lumpy but should be smooth once heated and combined.  Continue microwaving in 30-second bursts, stirring in between, until the mixture has reached the correct consistency. You should be able to coat the back of a spoon with the curd.  Don’t overcook as it will set too hard.

Use the jug to pour the lemon curd into jars.  Leave to cool, then seal. 

The recipe was given to me in imperial measurements so I have added metric measures.  

Friday, July 13, 2012

etcetera


Brioche and Jelly

I was right about the brioche, it was a perfect match for the Christine Ferber Gewürztraminer & Rose Petal jelly (see last etcetera post). 

On a trip to the city, I stopped off at local artisan bakery, Albert’s Kitchen in Pukekohe.  Although I hadn’t recalled seeing brioche there before I decided to try anyway.  My decision was pure serendipity and, it turned out, most timely. The store had only introduced brioche loaves that very day. Four or five full plaited loaves loomed large on the counter.  My only thought was how was I going to eat it all!  I was assured a loaf could be frozen so left very happy.

Next day I had a breakfast that turned into an occasion, albeit a solitary one as no-one else was home. Or to put another way, did I deliberately wait until I was alone?

I couldn’t wait to open the jar.  This one was going to be eaten now. 

With one enthusiastic twist, it was done. I barely had to lean forward to inhale the aroma – there it was, a divine perfumed scent assailed my olfactory senses.  I was in heaven after just one whiff.   Had I not been able to eat the jelly, just inhaling it would suffice.  Do you ever, as I seem to do, keep sniffing the heady scent of roses or fresh coffee and you can’t get enough, so you keep on sniffing, inhaling deeper each time?  That was how it was. 

The jelly easily surpasses any jelly or jam I have ever tasted or, for that matter, made.  Pure heaven on a spoon.  I sliced some brioche from the loaf and lightly toasted and buttered them. Then I dropped pretty teaspoonfuls of beautiful, clear jelly on each slice.  I could go on but I’m sure you get the picture.

That evening, after declining a taste, I asked Bill to just take a sniff of the open jar.  He did so.  Obviously encouraged, he said he’d try a spoonful.   His comment?  “You shouldn’t have done that”.  I’ve now hidden the jar.  I didn’t really need anyone to confirm how exquisite it was.


Subscribe by email

It’s taken me a while but I finally added the option to subscribe to this blog by email.  You’ll find the spot on the column at the right just under ABOUT ME.  


Sunday, July 1, 2012

maple banana porridge


Right now in the winter months, I’ve been giving the muesli a break and am fuelling up with porridge in the mornings.  Creamy and warming, it’s quick and easy to make in the microwave and, of course, very nutritious.  If I’ve got a little extra time, I make this maple banana porridge, adapted from one made in a pot by Bill Granger.  This microwave version cuts down on the amount of sugar used (Bill uses brown sugar and maple syrup) but sugar lovin’ me still loves it.

Slicing the banana thinly ensures it almost dissolves into the porridge. 

Serve with milk and a little cream and of course maple syrup. 

Bill Granger serves buttered apples with his version, making it the most wonderful dish.  I save that for when I’ve got plenty of time.


maple banana porridge

For one serving (I prefer a smallish serving so feel free to adjust amounts)

¼ cup rolled porridge oats
½ banana, thinly sliced
1/3 cup water
¼ cup milk
a wee pinch of salt

to serve
1 tsp maple syrup
1 tsp cream
milk


Place the porridge oats, banana, water, milk and salt in a microwaveable dish (for extra convenience use your cereal bowl if it is suitable for the microwave and is deep enough for porridge not to spill over).  Stir and microwave on high for one minute.

Remove from the microwave and stir again.  Return to the microwave for another 30 second blast.  Remove and stir.   Microwave a further 30 seconds (keep an eye on it and hit the stop button if it starts to overflow).  The porridge should have cooked and be fairly creamy at this point.  If not, microwave for a further 20 seconds or so until it has reached a consistency to your liking. 

Transfer to a serving bowl (warmed would be good).  Drizzle with one teaspoon of maple syrup and a little cream and serve with milk.


Sunday, June 24, 2012

Rosemary Spiced Pickled Pears


Sometimes I can get particularly precious with recipes.  This is one of those.  I’ve been asked for this recipe many times over and somehow felt disinclined to let go of it.  Maybe it’s because I often take it as a gift and once it’s out there then I feel it would no longer be special to me (or people will see just how easy it is and feel cheated?).  I’m selfish, I know.  I was told often enough by my nearest and dearest when I was younger.  So now I am going to be very grown up and magnanimous and share the recipe. 

Now, I confess it’s not that noble a gesture for, if you Google the title, you’ll get many variations on similar recipes.  I spotted one using star anise and thought that would be worth a go.  This particular one comes from a class my sister and I attended many, many years ago on edible Christmas gifts and I think it comes from Leanne Kitchen.   I’ve been making it ever since, slightly altered from the original.  I love the warm, amber syrup with the cool pears.


Serve the pears, either in quarters or chopped, with meats or cheeses.  I love them served with curries or to replace ordinary pears in salads with baby spinach and walnuts.  One friend uses the leftover liquid poured over boiled white rice (you can also splash it in dressings), whilst another has eaten the pears with ice cream even though he was warned they were savoury, not sweet – he liked them.

No matter how you try them, enjoy.  I feel a much nicer person now.


Rosemary Spiced Pickled Pears

Recipe makes about 4 jars, depending on jar size.

2 cups (500ml) white wine vinegar
2 cups (500ml) water
2 cups white sugar
2 teaspoons hot chilli flakes
several sprigs of fresh rosemary*
6 Beurre-Bosc pears


*Snip (don’t chop) the fresh rosemary sprigs to fit the jars you are using.  I normally work on about 2 sprigs to each jar depending on the size of the jars. 

Place the vinegar, water, sugar, chilli flakes and rosemary sprigs in a large pan and simmer, stirring occasionally, until the sugar is dissolved.

In the meantime, peel the whole pears leaving the stalks attached.  Cut each pear into half, then quarter (still leaving stalk attached).

Add the quartered pears to the pan and simmer for 30 minutes or until pears are soft.  Stir gently once or twice to ensure pears are evenly covered. 

While the pears are simmering, sterilize your jars and lids.  I wash mine in hot, soapy water, rinse the jars and microwave them (still with water attached) for one minute.  I pour boiling hot water from a kettle over the lids.  I also hot wash some tongs and a pouring jug to use when filling the jars.

Distribute the pears and rosemary sprigs evenly between the jars.  Unless you have a pouring spout on your pan, pour the remaining liquid into a pouring jar then into each jar, right up to the top.  Place lids on top and twist to ensure they are sealed.  Wipe each jar with a warm, damp cloth to remove residue syrup. 

Store in a cool, dark cupboard.  Try to leave for a month to develop the flavours.

Serve either in quarters or chopped with meats, cheeses, etc.  They are also particularly good with curries or make lovely gifts.


Friday, June 15, 2012

etcetera


Eye-catching and pretty in their little trademark polka dot covers and white bows, I first discovered Christine Ferber jams years ago on Chocolate and Zucchini website.  Back then, her unusual flavour combinations were less common.  It was only natural then that they should be on my Paris list in 2004. 

Some time later, I bought her book Mes Confitures and made the Belle-Helene jam of pears and dark chocolate (see photo below) – a very sweet concoction which went well with pancakes.


Back in Paris in April this year, a Christine Ferber confiture was back on my list.  I found some at Galeries Lafayette and after much humming and hawing, I selected the Gerwurztraminer and Rose Petal Jelly because of its pale delicateness and the little rose petals that you can’t see in the photo as they are at the bottom of the jar.  Thankfully it survived the trip home, swaddled in soft clothing in my suitcase.

While I could spend hours admiring the jar, I do want to try the contents soon.  Now what to pair it with?  Spread over a light, sweet brioche, perhaps, so as not to overpower what I think will be a delicate flavour.   Any other ideas?

I really do urge you to take a look at the exquisite flavours here.

Sunday, May 27, 2012

breakfast in a bar


No, breakfast in a bar is not about having your first meal of the day in a drinking establishment, even if some days it might seem like a good idea.  Although you could call it brunch and then a glass or two of bubbly is acceptable and that’s what I sipped today at our Auckland food blogger catch up brunch, hosted by Allison, Pease Pudding, way out west in Muriwai.  Thanks Allison for a relaxing Sunday morning at your home.  Particularly pleased to meet Food Opera’s Ingrid and Vanessa’s lovely new babies who led us to believe that motherhood is all coffee and cake and sleeping babies.  But hey, they didn’t fool us – we know what they get up to at home.

My contribution to the brunch was these muesli bars.  If muesli means “healthy” to you, think again.  These bars tip the other end of the scale, in more ways than one, so you have been warned.  On the other hand, if you like sweet, sticky buttery goodness, crammed with fruit and nuts and crispness, say hello to these.

The recipe states it makes 12 bars.  They must be giant sized as I managed 30 portions of 4cm x 6.5cm bars (a reasonable-sized bar, I thought).  Halve the recipe, if you don’t want so many.

muesli bars

Adapted slightly from a recipe in the lovely The Hummingbird Bakery Cookbook.

320g unsalted butter
240ml golden syrup
250g soft brown sugar
250g rolled porridge oats
200g desiccated coconut
100g dried apricots, chopped finely
85g dried dates, chopped finely
125g cornflakes
125g sunflower seeds
60g dried cranberries
60g raw almonds, chopped
60g raw brazil nuts, chopped
125g raisins


Line a 33 x 23 x 5cm baking tin or tray with greaseproof paper.

Gently heat the butter, golden syrup and brown sugar in a saucepan, stirring occasionally, until the butter has melted and the mixture is smooth. 

In a large bowl, mix the porridge oats, coconut, apricots, dates, cornflakes, sunflower seeds, cranberries, almonds, brazil nuts and raisins until it is well mixed. 

Pour in the liquid mixture and stir to combine thoroughly, making sure all the ingredients are evenly coated in the liquid.

Press the mixture into the baking tin or tray and level with a spoon (I used a stainless steel rolling pin to flatten and compress it).  Cover with a sheet of greaseproof paper, then a tray, covered with weights (I used filled tins e.g. baked beans) to further compress the mix

Leave to cool, then refrigerate overnight.

Cut into bars or squares.


Saturday, May 12, 2012

Mini black forest gâteaux


I feel I am just settling back in after almost five weeks away overseas.  It’s always exciting to get back and to relate stories and experiences to willing friends, but after a couple of weeks the memories start to fade into the background.  Food is one way of keeping memories alive.  I’ve been thinking of Black Forest gâteau since my return.  I don’t know why except to say it used to be something my father made when we were younger and it was grand and delicious.  I want to say this is for you, Dad, to say thank you and happy birthday.

I’ve taken this gâteau and kind of deconstructed it into a slightly simpler cake.  It's light and airy but still packed with cherry and chocolate flavour.

Use Texas muffin pans for the recipe and size featured.  The traditional cake is flavoured with Kirsch, a cherry brandy.  I omitted this only because I didn’t have any so please use it if you have some to give it its’ true flavour.


Mini black forest gâteaux

90g butter, softened
165g caster sugar
3 eggs, separated
55g self-raising flour
35g cocoa powder
1 tablespoon milk

Ganache topping
¼ cup cream
110g dark chocolate, chopped

Filling
½ cup cream
1 425g tin stoneless black cherries
or use fresh cherries in season
a small splash of Kirsch liqueur (optional)

Makes 6 large (Texas) muffin size cakes

Preheat oven to 180°C/350°F.  Grease the Texas muffin tray. 

Beat the softened butter, caster sugar and egg yolks with an electric mixer until light and fluffy.  

Sift the flour and cocoa together and fold into the egg mixture, along with the milk. 

In a clean bowl, beat the egg whites with an egg beater or electric mixer until soft peaks form.  Fold the egg whites into the cake mixture until just incorporated.

Divide the cake mixture between the muffin tray and bake in the oven for approximately 20 minutes or until the chocolate sponges spring back when lightly pressed with fingertips and a metal skewer inserted in the middle is clean.

Stand for 5 minutes then using a plastic spatula gently loosen the sponges around the edges of each cake. Turn the pan upside down onto a wire rack and tap against the bench once or twice to loosen the sponges onto the rack. 

While the sponges are cooling, make the chocolate ganache by heating the cream in a saucepan until it is boiling.  Remove from heat and pour over the chopped chocolate.  Stir the chocolate until it is smooth.   Put aside to cool – it will thicken as it cools.  If it thickens too much, warm it gently over simmering water in a pan (without the bowl touching the water).

With the sponges turned upside down (the widest part being the bottom of the cake i.e. an upside down muffin), use a sharp, serrated knife to slice the cakes in half horizontally.

Whip the second measure of cream to just slightly-firmish peaks (don’t go too firm).  Drain as many of the cherries as you want to use and fold them gently into the cream, along with the Kirsch (if using).  Save some cherries for decoration.

Spread some cherries and cream filling onto the bottom half of the cake and press down with the top so that the cream and cherries show around the middle of the cake. 

Using a palette knife, spread the chocolate ganache over the top of the cake. Decorate with two cherry halves or shaved chocolate.

This cake is my entry for Sweet New Zealand, hosted this month by the lovely Jemma at Time for a Little Something.  See here for more details.